
Remove White Halos from Transparent Sprites Without Losing Shadows
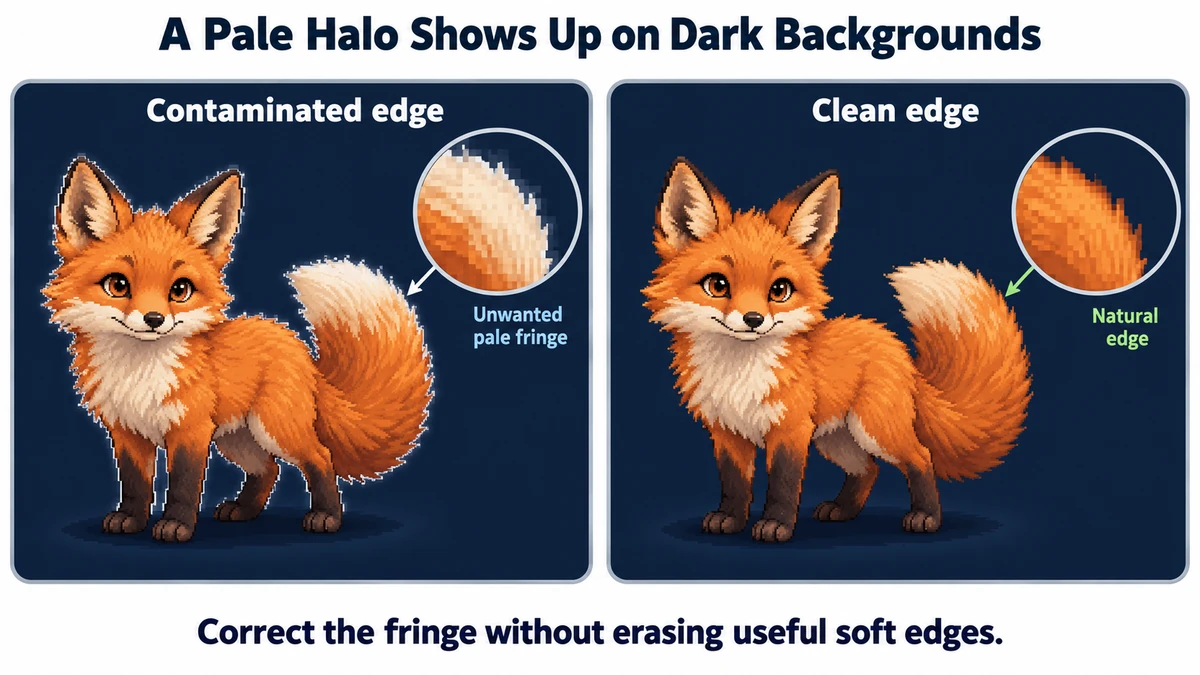
A transparent character looks clean on white but has a pale fringe in your dark game scene. The fix is not to erase every pale pixel. First identify whether the problem is a contaminated edge color, stray low-opacity pixels, or a background that was never removed.
Check whether the image is actually transparent
Open the original over both light and dark backgrounds. If the whole rectangle is white, use background removal first. PNG is a file format, not proof that a file has transparent pixels. If only a thin pale border appears on dark backgrounds, a known white matte may be contaminating semi-transparent edges.
Keep an untouched source. The edge cleaner accepts PNG and WebP with transparency and exports a new PNG; it cannot recover a clean cutout from a flattened JPEG. For artwork that already looks correct, do not apply correction simply because a control is available.
Run a controlled white-matte comparison
- Upload the transparent sprite and choose white as Unwanted edge color only if white is the known contamination.
- Set Remove very faint pixels to 0 and leave Trim transparent padding off. This isolates color correction from alpha removal and cropping.
- Try a low Correction strength, run the correction, and inspect the original and corrected previews. Increase strength only if the known fringe remains.
- Download the candidate and inspect it in the actual dark scene and on a light background. Compare the silhouette, highlights, hair, and shadow separately.
A simplified red edge at half opacity, blended with white, carries pink RGB even though it should carry red. Un-matting attempts to recover red while keeping the partial opacity. If the original edge already carries clean red, the same operation can over-correct it. The matte must describe the source, not the desired output background.
Remove faint specks without erasing useful effects
Alpha ranges from 0 to 255. A cutoff of 16 removes pixels whose opacity is about 6% or less; a cutoff of 64 removes pixels up to about 25%. That includes any intended shadow or smoke at those values. Increase in small steps and rerun the operation. If the result becomes fully transparent, lower the cutoff instead of treating the source as broken.
| Problem | Use | Watch for |
|---|---|---|
| Known pale matte fringe | Matte color and strength | Over-darkened edges on light backgrounds |
| Detached faint pixels | Small alpha cutoff | Missing soft shadow or smoke |
| Extra transparent canvas | Optional trim | Changed frame size and pivot |
| Opaque background | Background removal first | Wrong expectations of edge correction |
Preserve padding when the sprite is part of a sequence
For a static icon, trimming can make placement easier. For an animation, each pose may have a different bounding box. Independently trimming them changes the position of the feet or handle relative to the image origin. This tool does not export offset metadata, so leave trim off when the engine needs a common canvas.
Decide whether the candidate is worth keeping
- The unwanted fringe is reduced on the intended background.
- Intended highlights and semi-transparent effects remain recognizable.
- The image also looks acceptable on a contrasting background.
- Frame dimensions still match the animation workflow.
- The original is saved separately and the downloaded PNG has been reopened.
Adjusted-pixel count is not a quality score. It tells you how many pixels were touched. If the candidate looks worse, reduce strength, change the matte only with evidence, or return to the original export pipeline. A clean source is preferable to repeated corrective passes.
Try the workflow
Compare the original and corrected PNG, with separate controls for matte correction, faint pixels, and padding.
Open PNG Edge Cleaner →