
Pixel Art Upscaler
Make pixel art bigger without blurring it — whole-number scaling, one solid block per pixel
Drop sprites here
or click to pick files — up to 20 at a time
Each source pixel is copied into a solid square block. Nothing is uploaded, and nothing is blended.
Scale
Whole numbers only. A factor like 1.5× would give some pixels a 2×2 block and others a 1×1 one, which is what makes a "nearest-neighbor" result still look wrong.
Available when a file turns out to be an integer upscale of a smaller original.
img.pixel-art,
canvas.pixel-art {
  image-rendering: pixelated;
}
Without this, the browser re-blurs the sprite whenever it resizes it for display.
Before you start with Pixel Art Upscaler
Upscale pixel art and sprites with nearest-neighbor scaling at whole-number factors so edges stay hard instead of blurred.
Best for
- Enlarging pixel-art sprites, tiles, icons, and small game assets
- Keeping every source pixel as a hard-edged block
- Processing up to 20 similarly scaled PNG outputs in one batch
Know before you start
- The tool replicates existing pixels; it does not invent new detail or upscale photographs
- Scale factors are whole numbers from 2× to 32×
- The output is PNG so crisp edges and transparency are preserved
Continue the workflow
How to use it
1. Drop your sprites in
Up to twenty files at a time, decoded by your browser and never uploaded. Each one is read back pixel by pixel and given a verdict: a true 1× source is ready to scale; already N× means the file is an exact block replication of a smaller original, and the panel offers to restore it first; soft edges means the palette is far too large for pixel art and the boundaries have already been blended by some earlier resize. The check is a reading of the pixels, not a guarantee — it tells you what the file looks like so you can decide, and it never claims to fix anything it cannot.
2. Pick a whole-number factor
Choose one of the chips or type any integer from 2 to 32. The row for each file shows the full pipeline before you commit — 32×32 → 8× → 256×256, or 256×256 → restore to 32×32 → 8× → 256×256 when the restore toggle is on. Restoring takes one representative pixel per detected block, the block’s top-left, and then applies your factor to that smaller image; it is only available when a file was actually detected as an integer upscale. Browsers cap how large a canvas can be, so a factor that would produce something past roughly 16,384 pixels on a side or 256 megapixels in total is refused with the largest factor that would fit, rather than silently handing you a blank image.
3. Check the preview, then download
The before and after panels are both rendered with image-rendering: pixelated, so what you see is what the file contains rather than a browser’s own smoothing of it. Download a single result or take every result as a ZIP. Output is always PNG: a lossy format would put soft, ringing edges back into an image whose entire point is that the edges are hard. The CSS snippet in the panel is the other half of the job — copy it into your stylesheet so the browser does not undo the work when it resizes the sprite for display.
Why the scale factor has to be a whole number
Nearest-neighbor scaling means each output pixel simply copies the colour of the nearest source pixel — nothing is averaged, so no new colours appear and no edge softens. That alone is not enough. The factor also has to be a whole number, and this is the part most tools quietly get wrong.
At 3×, every source pixel becomes an identical 3×3 square. The grid stays uniform and each original pixel gets exactly the same amount of the output image. At 1.5×, the sampling grid no longer divides evenly: two source pixels have to share three output pixels, so one becomes a 2-wide block and its neighbour a 1-wide block, in an alternating pattern across the whole image. There is still no blending — the result is technically nearest-neighbor — but the pixel sizes are visibly inconsistent. Straight lines pick up an uneven stagger, diagonals develop a staircase that was never in the artwork, and a checkerboard dither turns into stripes. It reads as a vague wrongness rather than an obvious blur, which is why it survives review so often.
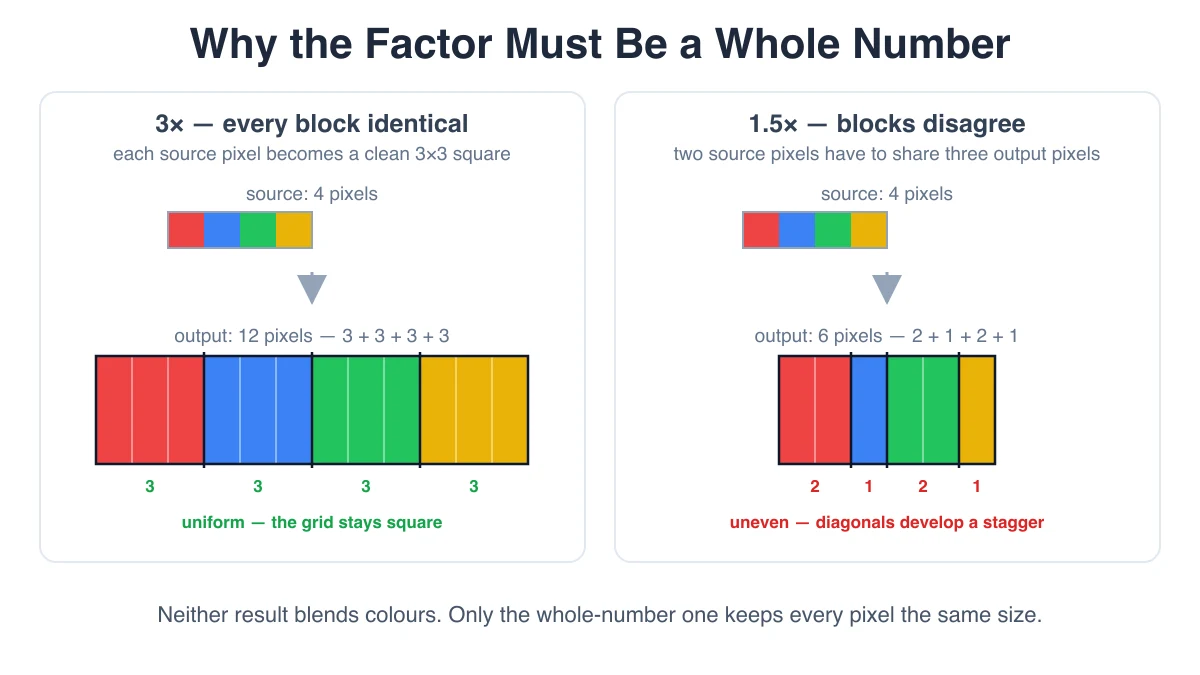
The practical consequence is to pick your target size backwards. If you need a 48×48 sprite to sit at roughly 150 pixels in a layout, export it at 3× (144) or 4× (192) and let CSS or your grid absorb the difference — do not ask a resizer for exactly 150. That is also why this tool takes a factor rather than a target width: there is no honest way to hit an arbitrary pixel target on pixel art, so it does not offer one.
Questions
Can this fix a sprite that is already blurry?
No, and nothing else can either. Once a bilinear or bicubic resize has averaged neighbouring colours into new intermediate pixels, the original hard boundaries are gone — the information about where one colour stopped and the next began was discarded when those in-between pixels were written. Sharpening raises contrast at edges but does not restore the discrete colour grid, and an AI upscaler invents plausible detail rather than recovering the real thing. The tool flags this case as soft edges so you know before you spend time on it. The fix is to go back to the original, unblurred source and scale that.
Why only PNG?
PNG is lossless, so the pixels in the file are exactly the pixels that were computed. JPG is built for photographs: it works by discarding high-frequency detail, and a hard boundary between two flat colours is the highest-frequency thing an image can contain, so it comes back with ringing and colour bleed around every edge — precisely the artifacts this tool exists to avoid. Lossy WebP has the same problem in a milder form. Offering either would be offering a way to undo the work.
What about hqx, xBRZ and scale2x?
Those algorithms look at each pixel’s neighbours and try to smooth the staircasing on diagonals and curves without introducing blur. They can look excellent on sprites with clean outlines and noticeably worse on dithered or noisy art, where the pattern matching reads the dithering as edges and smooths detail the artist put there on purpose. This tool does not implement them, because plain integer nearest-neighbor is the predictable choice and the one you want by default. Our guide to upscaling pixel art covers what each of them actually does and when reaching for one is worth it.
Why does my image look blurry in the browser after downloading?
Because the browser resized it again at render time using its own default smoothing. Any responsive container, page zoom, or high-DPI screen can trigger that, even when the file is already at the size you meant to display. Add image-rendering: pixelated to the <img> or canvas element — the snippet in the tool panel is exactly this — and the browser uses nearest-neighbor sampling instead. In a game engine the same setting lives on the texture: Point or Nearest filtering, set separately from your export scale.
Does it work on photos?
It will run, but nearest-neighbor is the wrong tool for a photograph. A photo is a sampled version of a continuous scene, so its gradients genuinely should be smooth, and blending neighbouring samples reconstructs something close to what a higher-resolution capture would have shown. Replicating each pixel into a hard square instead gives you visible blockiness with no detail gained. Use a normal resize for photographs and keep this for art drawn on a pixel grid.
Related
The full background — why bilinear resizing ruins pixel art, what point filtering does in Unity and Godot, and where hqx and xBRZ fit — is in how to upscale pixel art without blurring it. If your art arrives as a sheet of frames rather than single sprites, cut it first: Sprite Sheet Slicer splits a sprite sheet into individual, correctly bounded PNGs, and scaling each frame afterwards keeps every frame on the same grid.