
How to Slice an Uneven AI-Generated Sprite Sheet
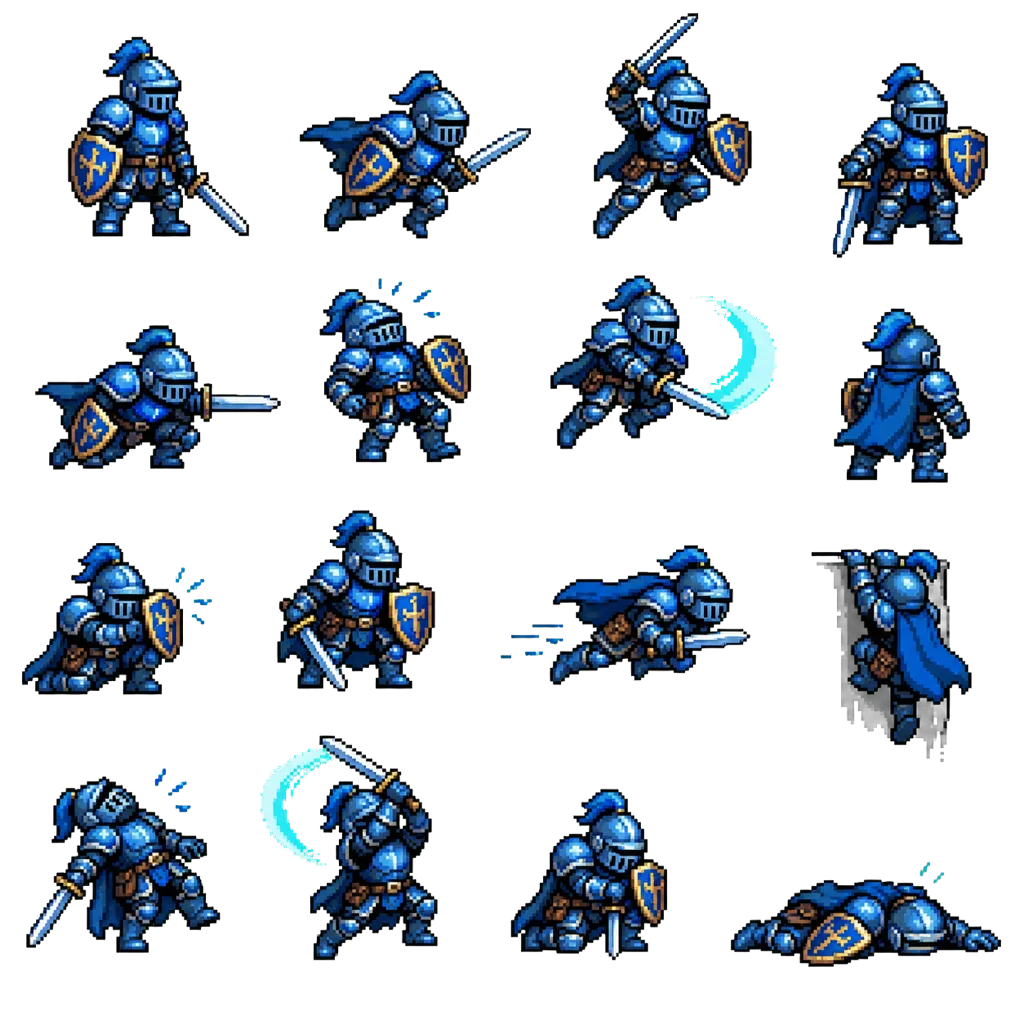
You asked an image model for a four-by-four walk cycle and got back one big PNG. It looks like a grid. It is not a grid. Cutting it into sixteen equal rectangles clips a head here, a sword tip there, and leaves half your frames off-center. Here is why that happens and how to get usable frames out of the sheet anyway.
Why AI sprite sheets are never on a perfect grid
A traditional sprite sheet is built by a tool. An artist draws frames at a fixed cell size, and an exporter packs them at exact pixel offsets. Every cell is identical, every sprite sits in a known box, and slicing is arithmetic.
Image generators do not work that way. Diffusion models such as DALL·E, Midjourney, and Stable Diffusion generate one continuous image. When you ask for "a sprite sheet of a knight walking, 4x4 grid," the model produces something that looks like a sprite sheet because it has seen thousands of them. It is imitating the visual style of a grid, not computing cell boundaries. Nothing in the generation process enforces that row three starts exactly 384 pixels down.
The practical consequences are consistent:
- Drifting spacing. Gaps between sprites vary by a few pixels to a few dozen. The drift usually accumulates left to right and top to bottom, so the bottom-right frames are the worst offenders.
- Inconsistent sprite sizes. A character mid-stride is wider than one standing still. The model draws each pose at whatever size looks right, not scaled into a uniform box.
- Off-center content. Even where cells are roughly even, the sprite inside a cell is rarely centered, so a correct grid cut still yields frames that jitter when played back.
- Missing or merged frames. Sometimes you get fifteen sprites in a 4x4 layout, or two poses that overlap and read as one blob.
- Odd canvas dimensions. A 1024x1024 output divided by three columns is 341.33 pixels. Something has to round, and rounding errors compound.
Why fixed-grid slicing fails
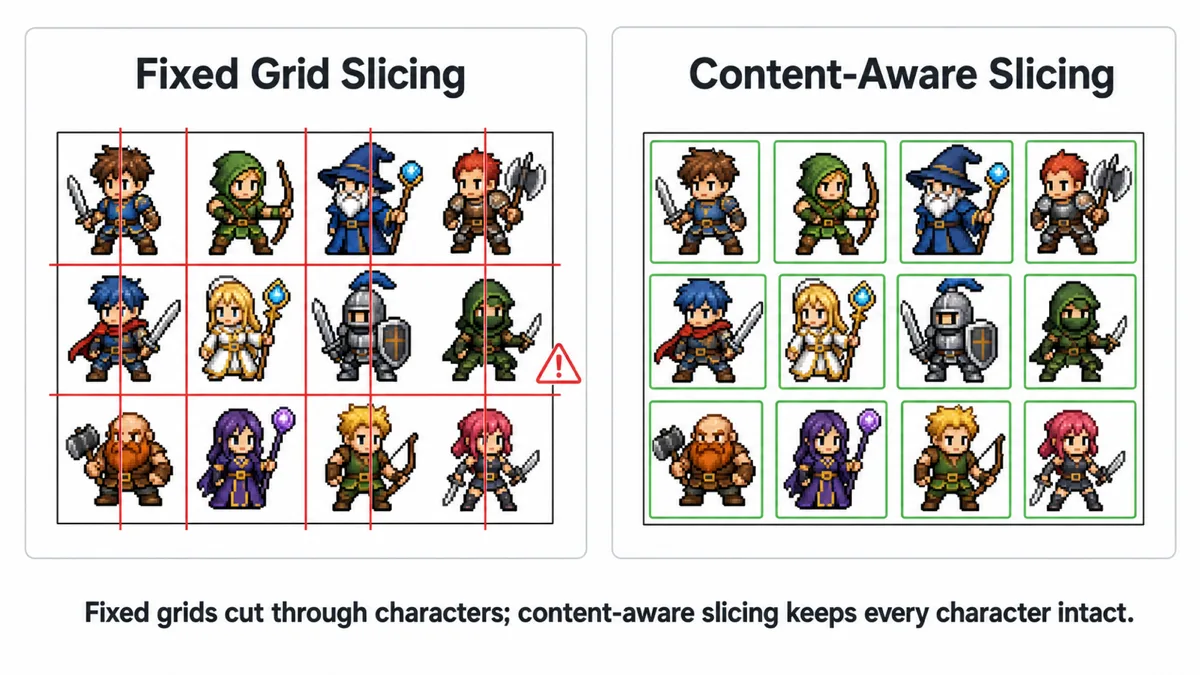
Fixed-grid slicing makes one assumption: the image is a lattice of equal cells. It divides width by columns, height by rows, and cuts. When that assumption holds it is perfect and fast. When it does not, the error is not random noise you can ignore. Every cut lands in the wrong place, and the errors are visible in exactly the way that matters most for animation.
A frame clipped by four pixels at the top is not just a cosmetic problem. In a game engine the frames are drawn at the same anchor point, so a sprite whose content sits four pixels lower in frame two than in frame one will visibly bounce during playback. Players read that as a bug even if they cannot name it. Fixing it by hand afterwards, frame by frame, costs more time than slicing correctly in the first place.
The fix: cut by content, not by coordinates
If the grid cannot tell you where the sprites are, the pixels can. On a sheet with a transparent background, every pixel is either part of a sprite (alpha above zero) or part of the background (alpha zero). That single distinction is enough to find the sprites without knowing the layout in advance.
How content-based detection works
- Confirm the background is transparent. Sample the corner pixels. If they are fully transparent, the sheet is a candidate for automatic detection. If they are white or a flat color, the sheet needs a background removal pass first.
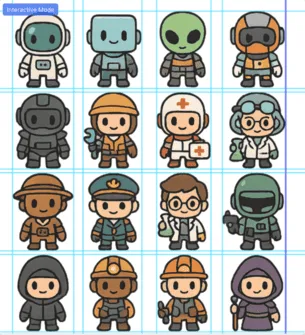
- Find empty rows and columns. Scan across the image and record which pixel rows contain no opaque pixels at all, and likewise for columns. Those empty bands are the gutters between sprites, wherever they happen to fall.
- Cut at the middle of each gutter. A gutter is a range, not a line. Cutting through its center gives each neighbouring sprite the most breathing room and tolerates a stray anti-aliased pixel or two.
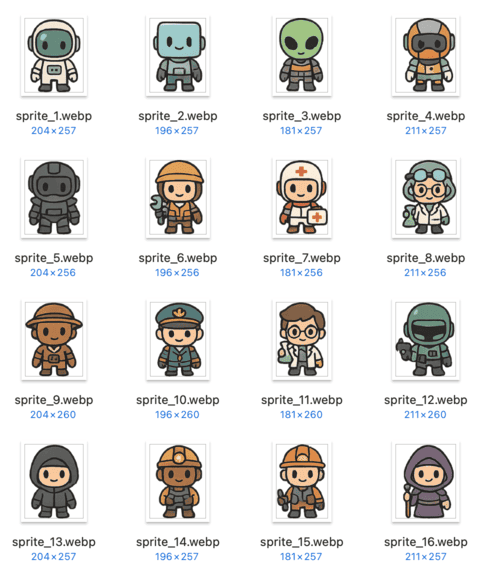
- Trim each piece to its own bounding box. Once a piece is isolated, shrink it to the tightest rectangle containing opaque pixels. This removes the uneven padding that made the cells look mismatched.
- Check the result and repeat. A first pass often leaves problems: one piece still contains two sprites because they touch, or a piece has far more empty space than its neighbours. Re-analyzing the output and subdividing or re-trimming catches most of those.
This is what the Magic Slice tab in our Sprite Sheet Slicer does. It detects transparent backgrounds, finds sprite boundaries from the alpha channel, and then runs up to three refinement passes, checking each produced slice for excess padding or multiple sprites and re-cutting where needed. A sensitivity setting of low, medium, or high controls how aggressive the boundary detection is: raise it when sprites nearly touch, lower it when a single sprite with detached parts (a floating shield, a spell effect) is being split apart.
Boundaries detected on the sheet
Sixteen files, each trimmed
If your sheet has a solid background
Content detection needs transparency. If your sheet has a flat white, black, or magenta background, run it through a background remover first — ours is at /remove-bg and works by sampling the corner pixels and clearing every pixel close enough to that color, then exporting a transparent PNG. Do this before slicing, not after: removing the background once on a single sheet is one operation, while doing it on sixteen separate frames is sixteen chances to get inconsistent results.
Manual grid lines: the fallback that always works
Automatic detection fails on some sheets, and it is worth knowing when. Sprites that overlap or touch cannot be separated by empty-band scanning, because there is no empty band. Sheets with a drop shadow or glow that spans the whole canvas have no fully transparent rows anywhere. Sheets where a single character is composed of detached pieces will be over-split.
For all of those, drag the lines yourself. The Manual & Preset tab starts from a preset grid between 2x2 and 6x6 — or a custom row and column count of your own, up to 20x20 — and then lets you drag each individual grid line to where it actually belongs. The workflow is:
- Pick the preset closest to the intended layout — 4x4 for a sixteen-frame sheet, even if the real spacing is off.
- Drag each vertical line into the gutter to its left or right. Work left to right so you are always adjusting against a line you have already fixed.
- Do the same for horizontal lines, top to bottom.
- Zoom in on the tightest frame — usually the widest pose — and confirm no line crosses it.
- Export. PNG preserves transparency and is what you want for sprites; JPG and WebP are also available, but JPG discards the alpha channel entirely.
Manual adjustment sounds slow and it is not: a sixteen-frame sheet has six interior lines total, so you are making six drags, not sixteen crops. Compared to opening the sheet in an image editor and marqueeing each frame, it is dramatically faster.
Preparing the frames for a game engine
Once you have individual PNGs, there are two routes into an engine: import them as loose frames, or re-pack them into a clean, uniform sheet. Which one you want depends on the engine and the project.
Unity
For loose frames, drop the PNGs into the project and set Texture Type to Sprite (2D and UI), Sprite Mode to Single. Set Filter Mode to Point (no filter) and Compression to None for pixel art — bilinear filtering on a 32x32 sprite is what makes it look muddy. Set Pixels Per Unit to match your grid, then select all the frames and drag them onto a GameObject to have Unity generate an Animation Clip automatically.
For a re-packed sheet, use Sprite Mode Multiple and the Sprite Editor. Grid By Cell Size only works if your repacked sheet really is uniform — which is precisely what re-packing gives you, and precisely what the original AI sheet did not.
Godot
In Godot 4, add an AnimatedSprite2D, create a new SpriteFrames resource, and use Add Frames from Sprite Sheet for a uniform sheet or Add Frames from File(s) to load your individual PNGs directly. Loose frames are the easier path here because the sprite sheet importer expects even cells. For pixel art, set the texture filter to Nearest — either per-node under CanvasItem → Texture → Filter, or globally via the rendering/textures/canvas_textures/default_texture_filter project setting.
Anchoring and alignment
This is the step people skip and then spend an afternoon debugging. If you trimmed every frame to its own bounding box, the frames now have different dimensions, and the engine will center each one on the same origin. A character whose arm extends in frame two will appear to slide backwards, because the extra width shifts the visual center.
The fix is to pad every frame back out to a common size with the content positioned consistently — usually centered horizontally and bottom-aligned vertically, so the feet stay planted. Decide the common size from the largest frame, round it up to a convenient number, and pad the rest with transparency. Trimming and then padding may sound circular, but it is not: trimming discards the generator's arbitrary padding, and padding re-applies padding you control.
Troubleshooting
Detection found far too many pieces
Sensitivity is too high, or your sprites have detached elements. Lower the sensitivity so small transparent gaps inside a sprite are not treated as gutters. If that does not help, switch to manual lines — a character holding a separate object will always look like two sprites to an alpha scan.
Detection found too few pieces
Sprites are touching, or a faint glow bridges the gap. Raise sensitivity first. If the sprites genuinely overlap, no automatic method will separate them; regenerate the sheet asking explicitly for clear space between frames, or cut manually.
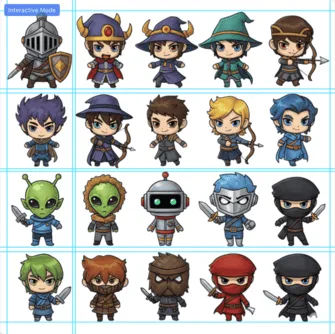
1. Sensitivity too low — few boundaries found
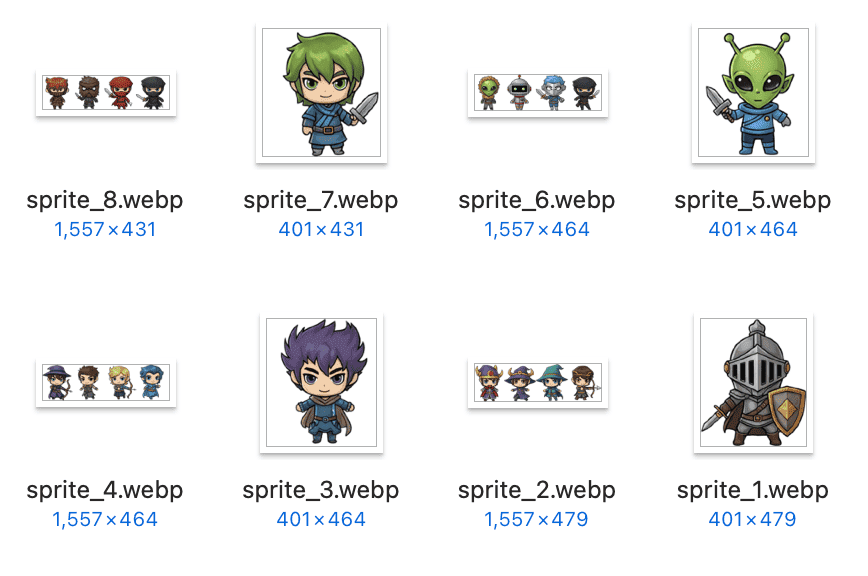
2. Eight files where twenty were expected
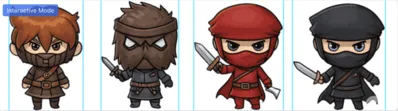
3. Why: no clear column between them
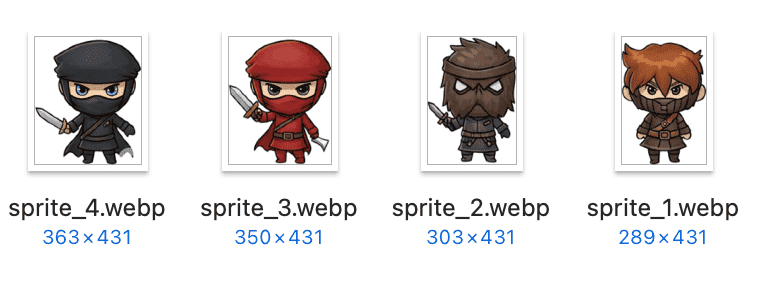
4. Sensitivity raised — four files
Frames have a faint outline of the old background
Background removal left semi-transparent edge pixels tinted with the old background color. See our guide on transparent PNGs and white edges for the fixes.
The animation jitters in-engine
Almost always an anchoring problem rather than a slicing problem. Confirm every frame has the same dimensions and the same alignment convention, and check the sprite pivot in the engine.
Nothing works, the sheet is a mess
Regenerating is cheap. Prompts that reliably improve the result: ask for a transparent background explicitly, ask for even spacing and consistent character size, request fewer frames per sheet (a 3x3 is far more likely to come out usable than a 6x6), and generate individual poses separately if the animation matters more than the convenience.
Frequently asked questions
Can I slice a sprite sheet that has a white background automatically?
Not directly with alpha-based detection, because there is no alpha channel to read. Remove the background first to produce a transparent PNG, then slice. Techniques that work on flat color instead of alpha exist, but they are far more fragile whenever the subject shares colors with the background.
Does slicing in the browser lose image quality?
Not if you export to PNG or WebP. Both are lossless for this purpose and keep the alpha channel intact. JPG is lossy and has no alpha at all, so a JPG export will both re-compress the pixels and replace transparency with a solid color. For sprites, always export PNG.
Are my images uploaded anywhere when I use the slicer?
No. All processing runs in your browser through the Canvas API. The image is read from your device into a canvas, sliced there, and written back out as downloads. Nothing is transmitted to a server, which also means the tool works offline once the page has loaded.
How many frames should I ask a generator for?
Fewer than you think. Quality degrades quickly as the number of cells rises, because each sprite gets less of the model's attention and less pixel area. A 3x3 or 4x4 sheet at 1024x1024 gives roughly 256 to 340 pixels per frame, which is enough detail to be usable. A 6x6 at the same resolution gives about 170 pixels per frame and the poses tend to blur together.
Try it on your own sheet
Open the Sprite Sheet Slicer, drop in your sprite sheet, and start with the Magic Slice tab. If the automatic detection does not land it, switch to Manual & Preset and drag the lines. Everything runs locally in your browser.
Open Sprite Sheet Slicer