
How to Split a Photo into an Instagram 3x3 Grid
A grid post takes one image, cuts it into nine tiles, and spreads it across three rows of your Instagram profile so the whole thing reads as a single banner. The slicing is the easy part. The part that trips almost everyone up the first time is the upload order — get it wrong and your carefully composed image comes out mirrored and scrambled.
What a 3x3 grid post actually is
Your Instagram profile shows posts as a grid of square thumbnails, three per row. A grid post exploits that layout: you post nine separate images that happen to be nine pieces of one larger picture. Visitors to your profile see the assembled image; followers scrolling their feed see the individual tiles.
That second half is the trade-off worth understanding before you start:
- Each tile has to survive on its own. In the feed, someone sees one square out of context. A tile that is entirely sky or entirely wall is a dead post.
- Nine posts in a row is a lot of posting. Publishing them back-to-back floods your followers. Many people accept that; some space the posts out, which means the grid is incomplete and looks broken for a while.
- The effect is temporary. The next thing you post pushes the grid down a slot and the alignment breaks. Grids stay intact only if you stop posting, or if you post nine at a time from then on.
- It only works on the profile grid. There is no version of this that shows up assembled in the feed, in Stories, or in Reels.
Used deliberately — a launch announcement, a portfolio header, a one-off statement piece — it is genuinely striking. Used casually, it is nine mediocre posts.
Step 1: Choose and size the source image
Start with a square image. The profile grid cells are square, so if you feed in a landscape photo, either you crop it to square yourself or Instagram crops it for you — and Instagram will crop each tile independently, which destroys the alignment between them. Crop to 1:1 before you slice, not after.
Resolution
Aim for at least 1080x1080 pixels in the source. Divided by three, that gives tiles of 360x360 each. Instagram displays profile thumbnails small but stores and serves the full post image, and 360 pixels is the point below which compression artifacts start showing on a modern phone screen.
Going larger is better and costs nothing. A 2160x2160 source yields 720x720 tiles; a 3240x3240 source yields 1080x1080 tiles, which is Instagram's preferred upload size for a square post. If you have the resolution available, 3240x3240 is the number to target.
| Source image | Each tile | Verdict |
|---|---|---|
| 1080 x 1080 | 360 x 360 | Minimum acceptable |
| 2160 x 2160 | 720 x 720 | Good |
| 3240 x 3240 | 1080 x 1080 | Ideal — matches Instagram post size exactly |
Composition
Before slicing, overlay a 3x3 grid mentally (or literally — most phone camera apps can show rule-of-thirds lines) and check what lands where. Two things to watch:
- Keep faces and text away from the cut lines. Instagram draws thin gaps between thumbnails, so a face split across two tiles reads as a face with a seam through it.
- Give the center tile something. The middle of the nine is the visual anchor and the tile people look at first.
Step 2: Slice it into nine tiles
With a square source, a plain even 3x3 cut is exactly what you want — no content detection, no clever alignment, just thirds. Our Instagram Grid Splitter is purpose-built for this and names the output files in upload order for you. If you would rather drive it yourself, the Sprite Sheet Slicer works too:
- Open the tool and switch to the Manual & Preset tab.
- Upload your square image.
- Set rows to 3 and columns to 3.
- Leave the grid lines where they are. They default to even thirds, which is correct here. (You can drag them, and occasionally it is worth nudging a line a few pixels to move a seam off someone's eye, but be aware that unequal tiles will be squeezed back to square by Instagram and the picture will not line up.)
- Choose your export format. JPG at high quality is a reasonable choice for photos since Instagram re-compresses to JPEG anyway; PNG is better if the image contains flat color, text, or graphics, where JPEG artifacts are more visible.
- Download as a ZIP, or download the tiles individually if you would rather not unzip on a phone.
All of the processing happens in your browser via the Canvas API, so the photo never leaves your device — worth knowing if the image is not public yet.
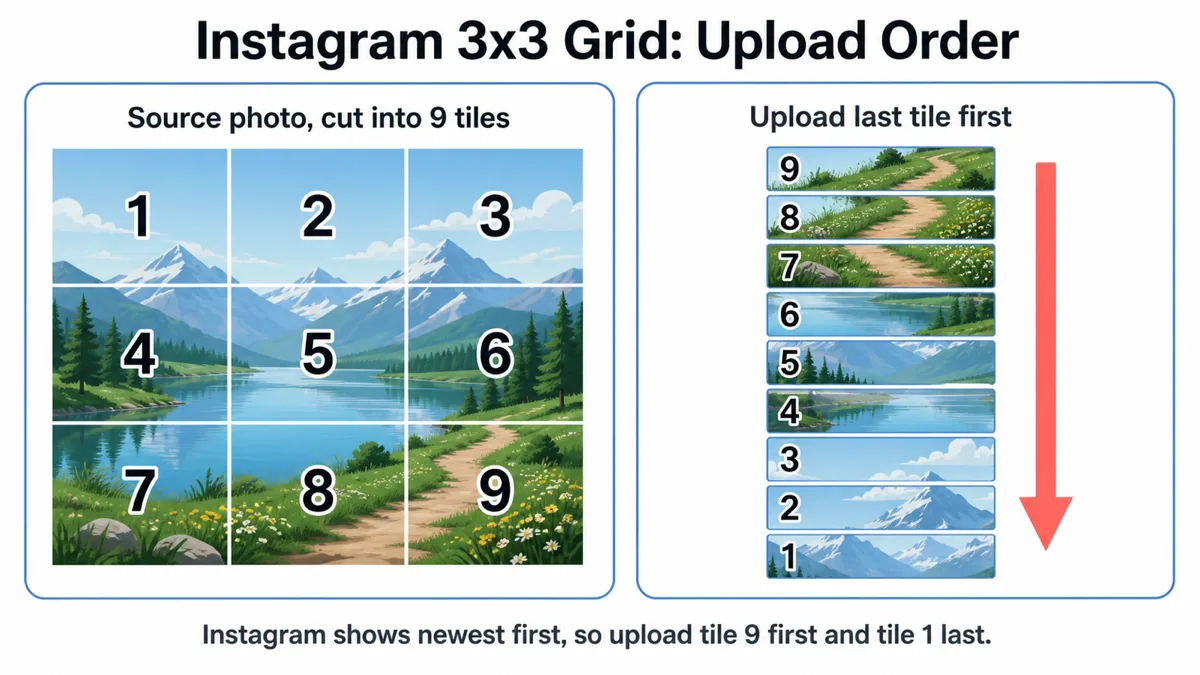
Tiles come out named in reading order: row 1 left to right, then row 2, then row 3. Keep those names. You are about to need them.
Step 3: Upload in reverse order
This is the step that matters. Instagram fills the profile grid newest first, top-left, moving right. Your most recent post occupies the top-left cell; the one before it sits to its right; and so on.
So the tile that must end up in the top-left is the one you post last, and the tile that belongs in the bottom-right must be posted first. You upload the entire grid backwards.
| Post # | Tile (reading order) | Position in grid |
|---|---|---|
| 1st | 9 | Bottom-right |
| 2nd | 8 | Bottom-center |
| 3rd | 7 | Bottom-left |
| 4th | 6 | Middle-right |
| 5th | 5 | Center |
| 6th | 4 | Middle-left |
| 7th | 3 | Top-right |
| 8th | 2 | Top-center |
| 9th | 1 | Top-left |
Post each tile as a separate single-image post. Do not use a carousel: a carousel shows only its first image as the profile thumbnail, so nine tiles in one carousel occupy one cell.
Practical tips for the upload run: rename your files 1 through 9 before you start and work down from 9, so you always know where you are. Post them in one sitting — a half-finished grid looks like a mistake to anyone who visits. And upload one at a time, waiting for each to finish, because if two posts land within the same second the ordering between them is not guaranteed.
Troubleshooting
The grid is mirrored left to right
You posted each row in the correct order but the rows themselves in the wrong direction, or you reversed the rows but not the tiles within them. The reversal has to be complete: the very last tile in reading order goes up first, full stop.
Tiles look cropped or shifted
Instagram cropped them on upload, which means they were not square. Check the export dimensions — every tile should be exactly the same square size. If your source was not a perfect square, the tiles inherit that aspect ratio and get cropped individually.
Visible seams between tiles
Some of this is unavoidable: Instagram puts a small gap between thumbnails, so there is always a physical seam. What you can control is whether the seam falls somewhere harmless. If it cuts a face or a word, re-crop the source so the important element sits inside a single tile.
The grid broke after I posted something new
Expected. Every new post shifts everything by one cell. Either stop posting to preserve it, or plan to post in multiples of three so the grid shifts by whole rows and stays column-aligned (it will still shift vertically).
Quality dropped after upload
Instagram re-compresses everything. You minimize the damage by uploading tiles at 1080x1080 (not larger — downscaling adds its own softness) and by exporting at high quality rather than letting a phone gallery app re-save them first.
Frequently asked questions
Can I do a 3x2 or 3x4 grid instead?
Yes. The column count is fixed at three by the profile layout, but the number of rows is up to you. A 3x2 grid is six tiles and less of a posting commitment; a 3x4 is twelve. The same reverse-order rule applies: last tile in reading order gets posted first.
Should I add captions and hashtags to every tile?
Put the real caption on the tile you post last, since that is the top-left one people land on and the one that stays most visible. For the other eight, keep captions short. Repeating an identical long caption and hashtag block nine times looks spammy to readers and is not a good look in the feed either.
Do the tiles need to be exactly 1080x1080?
No, but they all need to be square and identical to each other. 1080x1080 is simply the size Instagram serves square posts at, so uploading at that size means no resampling on the way in. Anything smaller than roughly 360x360 will look soft.
Can I delete one tile and repost it?
You can delete it, but the repost becomes your newest post and jumps to the top-left, pushing everything else along one cell and breaking the whole grid. To fix one bad tile you effectively have to delete and repost every tile from that position onward. Check all nine before you start posting.
Split your photo now
The Instagram Grid Splitter handles the whole thing: pick a 3×3, 3×2, or 3×1 layout, drag the square crop to frame the shot, and download a ZIP whose files are already numbered in upload order — post upload-01 first and work down. Runs entirely in your browser; the photo never gets uploaded anywhere.
Open Instagram Grid Splitter