
How to Upscale Pixel Art Without Blurring It
Drop a 32×32 sprite into almost any image editor, resize tool, or CMS thumbnail pipeline, and it comes out soft — the crisp pixel grid replaced with a smear of intermediate colors. That is not a bug in the software. It is the default resizing math doing exactly what it was designed to do, on an image where that math is the wrong choice.
Why a normal resize blurs pixel art
Every general-purpose image resizer — the one built into your browser, your OS thumbnail viewer, Photoshop's default, most web frameworks' automatic image optimization — uses some form of interpolation. The most common is bilinear, and the more expensive variants (bicubic, Lanczos) are refinements of the same idea: to compute a new pixel, look at the neighboring pixels in the source image and blend them by distance.
That is the correct approach for a photograph. A photo does not actually have hard edges at the pixel level — a gradient across a cheek or a blurred background is supposed to look smooth, and blending neighboring samples reconstructs something close to what a higher-resolution capture would have shown. The math assumes the image is a sampled version of a continuous scene.
Pixel art is not a sampled photograph. Each pixel is a deliberate, discrete decision by an artist — this exact color, in this exact cell, with a hard boundary to the next one. When a bilinear resizer scales that up, it manufactures gradient pixels between colors that were never meant to blend, because it has no way to know the boundary is intentional. The result is the familiar soft, hazy look: sharp black outlines turn into grey halos, and flat color fields pick up a subtle gradient that was never in the source.
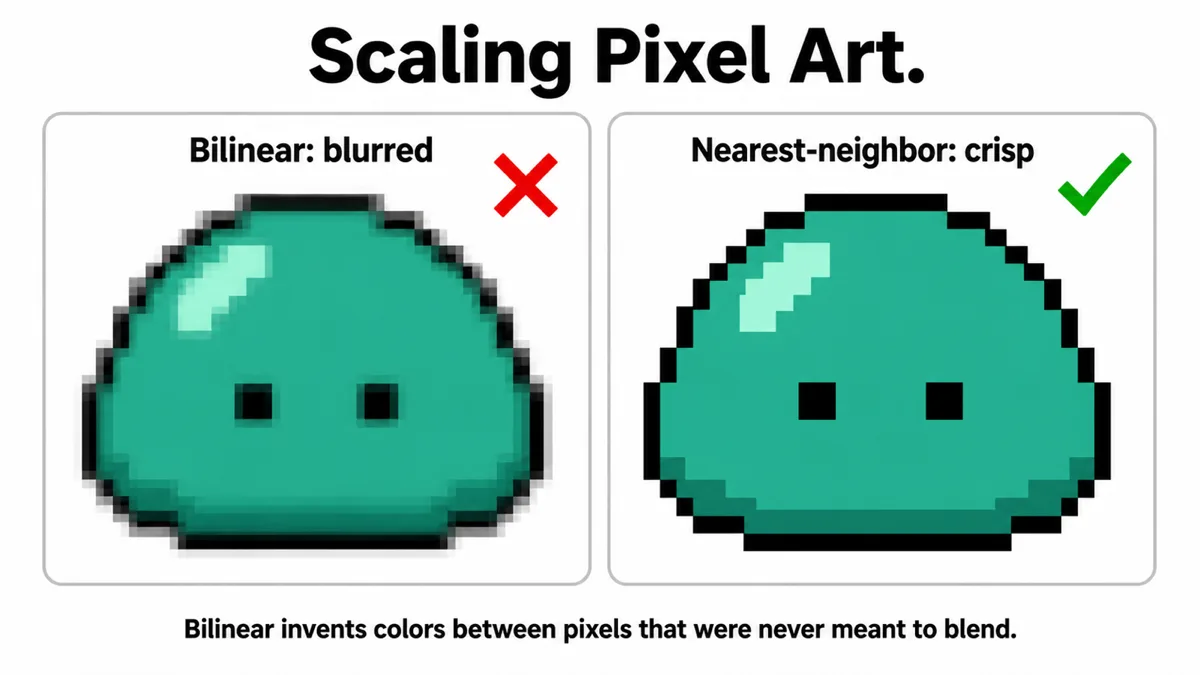
Nearest-neighbor: the baseline fix
Nearest-neighbor scaling asks a different question. For each pixel in the output image, it does not blend anything — it just copies the color of the single closest source pixel. Scaling a 16×16 sprite to 64×64 at nearest- neighbor means every source pixel becomes a solid 4×4 block of identical color. No new colors are invented, no edges soften. This is the minimum requirement for pixel art to look like pixel art after scaling.
Most tools expose this as an explicit option rather than a default, because nearest- neighbor is a poor choice for photographic content — it produces blocky, jagged results there. You have to opt in:
- Photoshop / GIMP: set the resample method to "Nearest Neighbor" (Photoshop) or "None" (GIMP) before scaling.
- ImageMagick: -filter point before -resize.
- Canvas API (browser/JS): ctx.imageSmoothingEnabled = false before drawing the scaled image.
- Python / Pillow: Image.resize(size, Image.NEAREST).
Why the scale factor has to be an integer
Nearest-neighbor alone is not sufficient. The second requirement is that the scale factor be a whole number — 2x, 3x, 4x — not 1.5x, not an arbitrary target width that happens to fall between clean multiples.
At an integer scale, every source pixel maps to an identically sized block of output pixels: 3x means every pixel becomes a clean 3×3 square. The grid stays uniform and every original pixel gets equal, consistent representation.
At a non-integer scale like 1.5x, some source pixels end up represented by a 2×2 block of output pixels and others by a 1×1 or a lopsided 2×1, because the sampling grid does not divide evenly. The image is still technically "nearest- neighbor," so there is no color blending, but the pixel sizes across the image become visibly inconsistent — some blocks look chunkier than others, and straight diagonal lines in the original art develop an uneven stagger they did not have before. It reads as a subtle, hard-to-place wrongness rather than a clean enlargement.
Practically, this means you should pick your target size by working backward from a whole-number multiple of the source dimensions, not forward from a fixed pixel target. If your source is 48×48 and you need it to display at roughly 150px, use 3x (144px) or 4x (192px) and let CSS or your layout absorb the difference, rather than asking the resizer for exactly 150px.
Keeping it sharp in CSS
Scaling the file itself is only half the problem on the web. Even a nearest-neighbor- scaled PNG will get re-blurred if the browser resizes it again at render time using its own default smoothing. The fix is a CSS property applied to the displayed <img> or canvas element:
image-rendering: pixelated;
This tells the browser to use nearest-neighbor sampling whenever it has to resize the image for display — including cases you do not control directly, like the user zooming the page or the image sitting in a responsive container that resizes with the viewport. It is supported in all current major browsers. An older, less consistently supported alternative is image-rendering: crisp-edges;, which some browsers treat identically and others treat as a slightly different sharpening algorithm; for pixel art specifically, pixelated is the more predictable choice.
Point filtering in game engines
Game engines have the same problem one layer down, because sprites get scaled by the camera zoom, screen resolution, and pixel-per-unit settings at runtime, not just once at export. Every engine exposes a texture filter setting, and the pixel-art-safe choice is consistently called some variant of "point" or "nearest":
- Unity: Filter Mode set to Point (no filter) on the texture import settings, covered in detail in our Unity sprite import guide.
- Godot: the texture's filter property set to Nearest, either per-texture or as a project-wide default for 2D pixel art projects.
- Unreal: Texture Group or Filter set to Nearest Neighbor on sprite textures.
Leaving the default bilinear/linear filter active is the single most common reason a pixel art game looks blurry in engine even though the source art files are crisp.
Dedicated pixel art scaling algorithms
Nearest-neighbor is honest but blocky — at high magnification, diagonal lines and curves in the original art show visible staircasing, because the algorithm has no concept of a line, only individual pixels. A family of algorithms designed specifically for pixel art tries to smooth that staircasing without introducing blur, by reasoning about local pixel patterns rather than treating each pixel in isolation.
- Scale2x / Scale3x (also called AdvMAME2x/3x): the simplest of the family. It looks at each pixel's four direct neighbors and, when a diagonal edge pattern is detected, splits the enlarged pixel so the edge appears to angle instead of step. Fast, and a reasonable default for simple sprites with clean outlines.
- EPX / hqx (hq2x, hq3x, hq4x): extends the same idea with a larger lookup of neighboring pixel patterns and more possible output shapes per pattern, producing rounder, more curve-like results. It works well on hand-drawn sprite outlines and less well on dithered or noisy pixel art, where the pattern-matching picks up false edges.
- xBRZ: a more recent, generally higher-quality descendant of the same lineage, tuned to produce smoother diagonals and curves with fewer artifacts on detailed sprites. It is the algorithm behind the upscaling filters found in many emulator front ends.
All three share the same limitation: they infer edges from local pixel patterns, so they work best on art with clean, deliberate outlines and struggle on stylized dithering, noise, or gradients built from alternating pixels — techniques common in older pixel art that these algorithms can mistake for edges to smooth. For most sprite work, a plain integer nearest-neighbor scale is the safer, more predictable choice; reach for hqx or xBRZ only when the staircasing on curves is visibly bothering you and you have checked the result against dithered areas.
Why AI upscalers are usually the wrong tool
General-purpose AI upscalers (the kind trained to add photographic detail to blurry photos) are built to solve the opposite problem from what pixel art needs. They are trained to hallucinate plausible fine detail — skin texture, fabric weave, foliage — from a low-resolution input, on the assumption that the input lost detail during downscaling or compression and the model's job is to guess it back.
Pixel art has not lost any detail. Every pixel is already exactly what the artist intended, at the resolution the artist intended. Running it through a model tuned to invent missing texture produces exactly what you would expect: smoothed edges, invented gradients, and small stylistic details (a single highlight pixel, an intentionally hard color break) either erased or replaced with something that looks vaguely painterly and nothing like the original piece. Some upscalers now ship a specific "pixel art" or "anime" mode that is closer to a constrained nearest-neighbor- plus-cleanup pass, and those can be worth testing case by case, but the general default mode built for photos is close to guaranteed to blur pixel art rather than preserve it.
If the sprite came out of an AI image generator in the first place — rather than being drawn as true pixel art — it likely is not on a clean pixel grid at all, and no scaling method will fix that; see our guide to AI sprite prompts for getting a cleaner source in the first place.
A practical checklist
- Confirm the source really is pixel art on a consistent grid, not a soft-edged raster export.
- Pick an integer scale factor (2x, 3x, 4x) based on your target size, not the reverse.
- Scale with nearest-neighbor / point sampling, not the tool's default bilinear or bicubic mode.
- Apply image-rendering: pixelated to any web element that might resize the image again.
- Set the texture filter to Point/Nearest in your game engine, separately from the export scale.
- Only reach for hqx/xBRZ if plain nearest-neighbor staircasing is visibly bothering you, and check the result on dithered areas first.
If you would rather not set any of that up by hand, our Pixel Art Upscaler does the first three steps for you: pick a whole-number factor between 2x and 32x and it replicates every source pixel with nearest-neighbor sampling, so nothing gets blended, and exports PNG.
Frequently asked questions
Can I fix a blurry sprite after it has already been scaled with bilinear?
Not cleanly. Once neighboring colors have been blended into new intermediate pixels, the original hard edges are gone and no amount of sharpening fully recovers them — sharpening filters increase contrast at edges but do not restore the discrete color grid. Re-scale from the original, unblurred source at an integer factor with nearest-neighbor sampling instead.
Does it matter if I scale up first or crop first?
Crop first, at the original resolution, then scale. Cropping after an integer scale-up still works as long as your crop boundaries land on multiples of the scale factor; cropping at an arbitrary pixel boundary in the enlarged image can slice through what was previously a single source pixel's block.
Why does my pixel art look fine in the editor but blurry once exported to PNG and viewed in a browser?
The editor is likely displaying the sprite at its native pixel size with its own nearest-neighbor preview zoom. The browser, without image-rendering: pixelated set, defaults to smoothing whenever the image element's rendered size differs from the file's native pixel dimensions — which is nearly always, once CSS or responsive layout is involved.
Is there a quality difference between nearest-neighbor and just not scaling at all?
Not scaling at all is a valid option when your layout can display the sprite at native size. Nearest-neighbor scaling only matters once you need the sprite larger or smaller than its source pixel dimensions, and even then it changes nothing about the actual color data — it only changes how many screen pixels represent each source pixel.
Scale a sprite without blurring it
Pixel Art Upscaler enlarges pixel art by replicating each source pixel with nearest-neighbor sampling at whole-number factors from 2x to 32x, so edges stay hard instead of being blended. It flags images that already look upscaled, exports PNG, and handles up to 20 files at once with a ZIP download — all in the browser, with nothing uploaded. If your pixel art arrives as a sheet of multiple frames rather than one image, cut it into individual PNGs with Sprite Sheet Slicer first, then scale the frames.
Open Pixel Art Upscaler