
How to Import a Sprite Sheet into Unity
Dropping a PNG into a Unity project takes a second. Getting it to render as crisp, correctly scaled, correctly sliced sprites takes about six settings, and most of them are wrong by default for 2D work. Here is what each one does, how to slice the sheet in the Sprite Editor, and when it is faster to cut the sheet before it ever reaches Unity.
Start with Texture Type
Select the imported PNG in the Project window and look at the Inspector. The first dropdown is Texture Type, and it defaults to Default — which is the 3D texture path. Change it to Sprite (2D and UI).
This is not cosmetic. It changes which import pipeline runs, exposes the sprite options below, and tells Unity to generate a Sprite asset rather than a plain Texture2D. Without it, SpriteRenderer has nothing to accept and the Sprite Editor button stays greyed out. If your project was created from the 2D template, new textures already default to Sprite, so check before you go hunting for the setting.
Remember to press Apply at the bottom of the Inspector. Unity does not commit texture import settings until you do, and changes silently revert if you select a different asset first. This trips up nearly everyone at least once.
Sprite Mode: Single or Multiple
Sprite Mode decides whether the file is one sprite or many.
- Single — the whole image is one sprite. Use this for individual frames you already cut into separate files, for backgrounds, and for UI images.
- Multiple — the image contains several sprites, and you will define their rectangles in the Sprite Editor. Use this for a genuine sheet you want to keep as a single file.
- Polygon — generates a custom mesh instead of a quad. Rarely what you want for a sprite sheet; it exists mainly for reducing overdraw on large, mostly-transparent sprites.
Multiple is the mode people reach for reflexively, but it is worth pausing. Keeping one sheet means one texture, one draw call batch, and one asset to manage. Splitting into separate PNGs means simpler animation setup, easier per-frame edits, and no dependence on Unity guessing your cell boundaries. Both are legitimate; the deciding factor is usually whether your sheet has a reliable grid.
Slicing inside the Sprite Editor
With Sprite Mode set to Multiple, click Sprite Editor. If the button is missing entirely, the 2D Sprite package is not installed — add it from Window → Package Manager. Inside the editor, the Slice dropdown in the top-left offers three types.
Automatic
Unity scans the texture for islands of non-transparent pixels and draws a rectangle around each one. On a clean sheet with transparent gutters and well-separated sprites, this works well and takes one click. It fails predictably in three cases: sprites that touch or overlap get merged into one rectangle; a character with detached parts (a floating weapon, a separated shadow) gets split into several; and any sheet with a non-transparent background produces exactly one rectangle covering everything, because the entire image is opaque.
The Method dropdown next to it matters when re-slicing. Delete Existing wipes your manual fixes; Smart tries to keep rectangles you have adjusted; Safe only adds new ones. Use Smart or Safe after you have hand-corrected anything.
Grid By Cell Size
You give a pixel width and height, and Unity lays a lattice over the texture. This is the right choice when you know the cell size — a 512×512 sheet of 64×64 tiles, for example. Offset and Padding fields handle sheets with a margin around the edge or spacing between cells. Set them once and every cell lands correctly, because a tool-generated sheet really is a lattice.
Grid By Cell Count
Same idea, but you give columns and rows instead and Unity divides. Convenient when you know the sheet is 4×4 but have not done the arithmetic. Watch out for textures whose dimensions do not divide evenly: 1024 divided by 3 is 341.33, and the rounding shows up as a one-pixel sliver of the neighbouring sprite along one edge of every cell.
Pixels Per Unit, and what it actually means
Pixels Per Unit (PPU) is the conversion rate between texture pixels and Unity world units. The default is 100, meaning a 100×100 pixel sprite occupies exactly one world unit square at scale 1.
Unity world units are abstract, but physics, camera sizes, and movement speeds are all expressed in them, so the number you choose sets the scale of your entire game. Two common conventions:
- PPU = your sprite's tile size. If your tiles are 16×16 pixels, set PPU to 16 and one tile equals one world unit. Tilemaps line up on integer coordinates, and a gravity value of −9.81 means something roughly physical.
- PPU = 100 for everything. Simpler if your art is high resolution and you are not doing tile-based movement.
The important part is consistency. Sprites imported at different PPU values will appear at different scales relative to each other, and the fix people usually reach for — adjusting Transform scale on individual objects — hides the problem while making colliders, physics, and prefab reuse harder to reason about. Set PPU correctly at import instead.
Filter Mode and compression for pixel art
Two settings decide whether your pixel art looks like pixel art or like a blurred smear.
Filter Mode defaults to Bilinear, which interpolates between texels when a sprite is drawn at anything other than 1:1. On photographic textures this is what you want. On a 32×32 character it produces soft, muddy edges. Set it to Point (no filter) for pixel art and the pixel boundaries stay hard.
Compression defaults to Normal Quality, which on most platforms means a block-compression format. Block compression works by approximating groups of pixels, and on flat-color art with hard edges the artifacts are obvious — colored fringing around outlines, especially near transparency. Set Compression to None for pixel art sprites. Yes, the texture takes more memory; a handful of small sprite sheets uncompressed is a rounding error against any modern memory budget, and the visual difference is not.
Also uncheck Generate Mip Maps for 2D sprites that are always drawn near their native size. Mipmaps exist for textures viewed at varying distances in 3D; in 2D they mostly consume memory and occasionally cause sprites to sample a blurrier level than intended.
| Setting | Pixel art | High-res / painted 2D |
|---|---|---|
| Texture Type | Sprite (2D and UI) | Sprite (2D and UI) |
| Filter Mode | Point (no filter) | Bilinear |
| Compression | None | Normal Quality |
| Generate Mip Maps | Off | Off for 2D, on if scaled far |
| Pixels Per Unit | Tile size (8, 16, 32…) | 100 |
| Max Size | At least the sheet's largest dimension | At least the sheet's largest dimension |
Pre-sliced files versus slicing in Unity
Unity's slicer is good at what it was built for: sheets produced by a tool, on a real grid, with transparent gutters. Grid By Cell Size on an Aseprite export is exact and instant, and there is no reason to do it anywhere else.
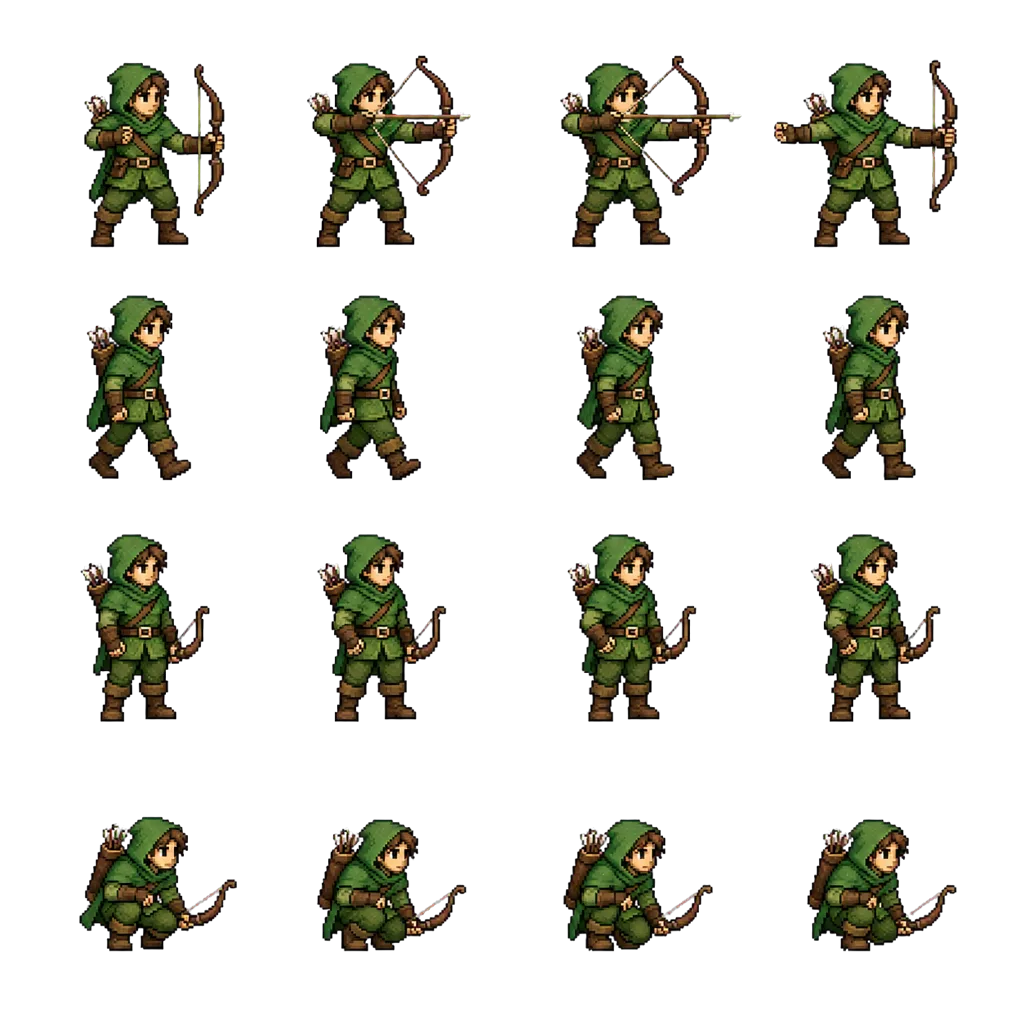
Sheets from image generators are a different problem. A model asked for a "4×4 sprite sheet" produces something that resembles a grid without being one: spacing drifts by a few pixels per cell, sprite sizes vary with the pose, and the content inside each notional cell is off-center. Grid By Cell Size cuts through heads. Automatic merges the two frames that happen to touch and splits the one with a detached shield. You then hand-drag sixteen rectangles in the Sprite Editor, which is a slow way to spend twenty minutes.
Cutting the sheet before import sidesteps that. Our Sprite Sheet Slicer finds sprite boundaries from the alpha channel rather than from assumed coordinates, trims each frame to its own content, and exports individual PNGs. Those come into Unity as Sprite Mode Single with no Sprite Editor work at all. If automatic detection does not land it, the Manual & Preset tab lets you drag each grid line into the right gutter — six drags for a sixteen-frame sheet, versus sixteen rectangles.
There is a real trade-off. Loose files mean more assets and, without a Sprite Atlas, more draw calls. If that matters for your project, slice externally to get correct frames, then add a Sprite Atlas asset (Assets → Create → 2D → Sprite Atlas) and drop the folder into its Objects for Packing list. You get correct boundaries and batched rendering, with Unity doing the packing it is genuinely good at.
From sprites to an animation
- Select the frames in order in the Project window — either the sub-sprites under a sliced sheet, or your individual PNGs.
- Drag the selection into the Scene or Hierarchy. Unity prompts for a save location and creates an Animation Clip plus an Animator Controller wired to it.
- Open the Animation window to adjust the sample rate. The default of 12 samples per second suits many walk cycles; 24 is smoother; single-digit values give a deliberately choppy retro feel.
- Confirm the frames are in the right order. Unity sorts by name, so frame_10 lands between frame_1 and frame_2 unless you zero-pad to frame_01.
- For more clips, duplicate the process and wire transitions in the Animator, or drive frames directly from script if you prefer avoiding the Animator entirely.
Frequently asked questions
Why does my sprite have a thin line of the neighbouring frame along one edge?
Texture bleeding. Either your cell size does not divide the texture evenly, or bilinear filtering is sampling across the rectangle boundary. Set Filter Mode to Point, disable compression, and verify the cell arithmetic. Adding a pixel or two of transparent padding between sprites in the source sheet prevents it permanently.
Should I use Sprite Atlas or one big sheet?
Sprite Atlas, in most cases. It lets you author sprites as separate files — easy to edit, easy to reorder — while Unity packs them into a shared texture at build time for batching. A hand-made mega-sheet gives similar runtime results with much worse ergonomics whenever a frame changes.
My animation plays but the character jitters up and down. Why?
Frames of differing heights sharing a Center pivot. Set the pivot to Bottom, or pad every frame out to identical dimensions before import so the content sits in a consistent place within each frame.
Do I need to change anything for the Universal Render Pipeline?
Import settings are the same. What changes is the material: URP 2D uses Sprite-Lit-Default when the 2D Renderer is active, which means unlit sprites can appear black until a light exists in the scene. Switch the SpriteRenderer material to Sprite-Unlit-Default, or add a Global Light 2D.
Slice the sheet before Unity sees it
If Unity's auto-slice is fighting your sheet, cut it in the browser first and import clean individual PNGs. Magic Slice detects sprite boundaries from the alpha channel; Manual & Preset lets you drag the lines yourself. Nothing is uploaded — it all runs locally.
Open Sprite Sheet Slicer