
How to Import a Sprite Sheet into Godot
Godot 4 will read a sprite sheet three different ways, and picking the wrong one is how you end up rewriting your animation setup twice. This guide covers AnimatedSprite2D with SpriteFrames, AtlasTexture regions, and the hframes/vframes shortcut on a plain Sprite2D — what each is for, and what to do when your sheet is not on a real grid.
Getting the texture into the project
Godot imports assets by watching the filesystem. Copy your PNG anywhere under the project directory and it appears in the FileSystem dock, with a .import file created alongside it. You never edit that file by hand; you change settings in the Import dock and press Reimport.
Before anything else, deal with filtering, because it is the single most visible setting for pixel art. In Godot 4 the texture filter lives on the node rather than the import, under CanvasItem → Texture → Filter. Set it to Nearest and hard pixel edges stay hard. Setting it per node gets tedious fast, so change the project default instead: Project Settings → Rendering → Textures → rendering/textures/canvas_textures/default_texture_filter → Nearest. Every CanvasItem left on Inherit then picks it up.
While you are in the Import dock, leave Mipmaps off for 2D sprites drawn near their native size, and note that Godot 4 compresses textures to VRAM formats only when you choose VRAM Compressed. The default Lossless mode is what you want for pixel art; VRAM compression introduces exactly the block artifacts that flat-color art shows off worst.
Method 1: AnimatedSprite2D and SpriteFrames
This is the path for anything that animates, and it is where most projects should start. AnimatedSprite2D is a node that holds a SpriteFrames resource — a named collection of animations, each of which is an ordered list of textures with a frames-per-second value and a loop flag.
- Add an AnimatedSprite2D to your scene.
- In the Inspector, click the Sprite Frames property and choose New SpriteFrames. A SpriteFrames panel opens at the bottom of the editor.
- Rename the default animation from default to something meaningful — walk, idle. You will be referencing these strings from code.
- Add frames with one of the two toolbar buttons: Add Frames from Sprite Sheet (the grid icon) or Add Frames from File(s) (the file icon).
- Set the animation FPS and the loop toggle, then play it back in the panel to check the timing before you wire up any code.
Add Frames from Sprite Sheet
Choosing the grid icon opens a dialog where you pick the PNG and then describe its layout: Horizontal and Vertical counts, plus Separation and Offset if the sheet has margins or gutters. The preview updates live, and you then click the cells you want, in the order you want them. Shift-click selects a range.
Two details worth knowing. First, the selection order becomes the frame order, so clicking cells out of sequence gives you an animation that plays out of sequence. Second, this dialog assumes an even grid, exactly like Unity's Grid By Cell Count. It has no content-detection mode at all — there is no equivalent of Unity's Automatic slice. If the grid is not real, this dialog cannot rescue it.
Add Frames from File(s)
Select several individual PNGs and they become frames in the order Godot sorts them, which is alphabetical. Zero-pad your filenames — walk_01.png through walk_12.png — or frame 10 lands immediately after frame 1. This route is the easiest one to get right, and it is why pre-slicing a sheet into files is often the smoother workflow in Godot specifically.
Method 2: AtlasTexture regions
An AtlasTexture is a resource that points at a region of a larger texture and behaves like a standalone texture everywhere Godot accepts one. You create one by setting any texture property to New AtlasTexture, assigning the sheet to its atlas property, and typing the region rectangle (x, y, width, height).
This is the most flexible option and the most manual. It shines when the sprites you need are at arbitrary positions, when several nodes need different pieces of one texture, or when you are generating the regions from data in code:
- A UI theme pulling nine-patch pieces and icons out of one shared texture.
- A tileset or item catalog where a script builds AtlasTextures from a JSON manifest exported alongside the sheet.
- One-off static sprites where creating a separate file feels like overkill.
The filter_clip property is worth knowing about: enabling it prevents the texture from sampling outside its region, which is the fix for a thin sliver of the neighbouring sprite bleeding in along an edge.
Method 3: hframes and vframes on Sprite2D
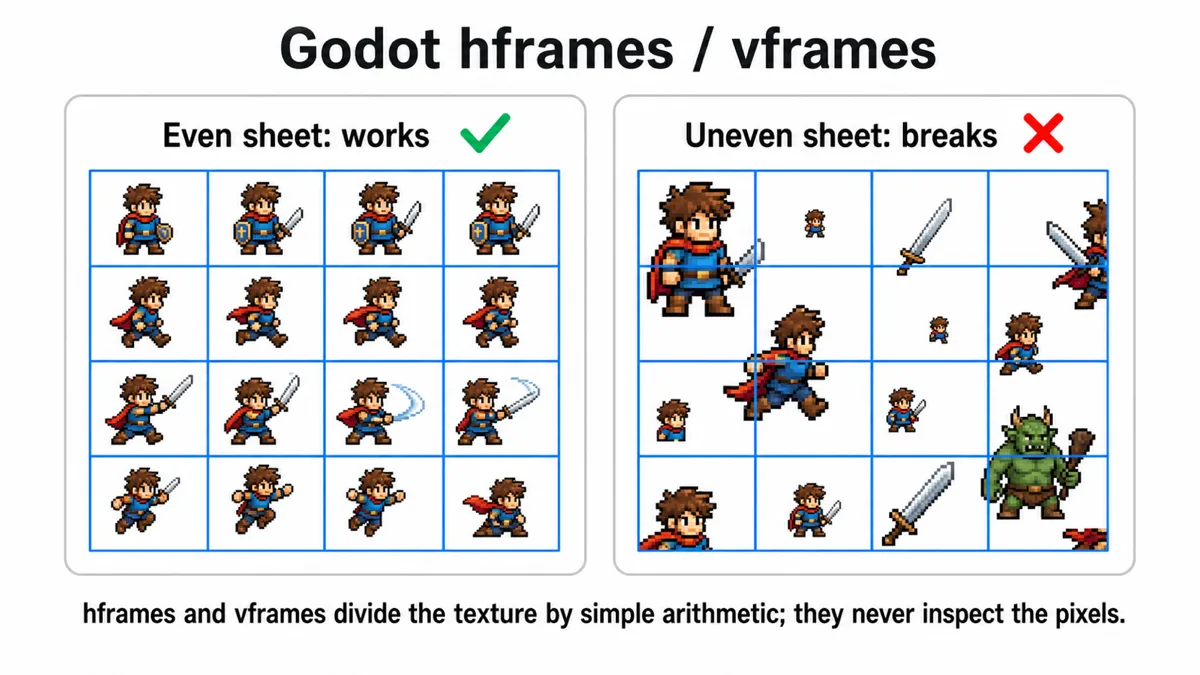
A plain Sprite2D has three properties that make it read a sheet with no extra resources at all: hframes, vframes, and frame. Set hframes to 4 and vframes to 4, and Godot divides the texture into a 4×4 lattice; setting frame to an index from 0 to 15 displays that cell.
It is the lightest-weight approach and it animates cleanly from an AnimationPlayer track on the frame property, or from a couple of lines in _process. For a tool-exported sheet it is genuinely all you need.
Why uneven sheets break all three, and what fixes it
Every method above shares an assumption: you can describe the sheet arithmetically. Add Frames from Sprite Sheet wants counts. hframes/vframes want counts. AtlasTexture wants explicit rectangles, which you can get right, but only by measuring each one by hand.
Sheets from image generators break that assumption. A model asked for a "4×4 walk cycle" produces something that looks like a grid because it has seen thousands of grids, not because it computed cell boundaries. Spacing drifts a few pixels per column and accumulates left to right; sprite sizes vary with the pose; content sits off-center inside its notional cell. Set hframes to 4 and the first column looks fine, the second is slightly clipped, and the fourth is cutting through the character.
The reliable fix is to stop describing the sheet and start reading it. On a transparent background, every pixel is either sprite (alpha above zero) or background (alpha zero), and the fully-transparent rows and columns between sprites mark the real boundaries wherever they happen to fall. Cut at the middle of each of those gutters, trim each piece to its own content, and you have individual frames that owe nothing to an assumed grid.
That is what the Magic Slice tab in our Sprite Sheet Slicer does, with a few refinement passes to catch pieces that still hold two sprites or carry excess padding. Export the results as individual PNGs and load them with Add Frames from File(s). When automatic detection struggles — touching sprites, a glow spanning the canvas, a character with detached parts — the Manual & Preset tab lets you drag each grid line into the correct gutter, which is six drags for a sixteen-frame sheet.
If your sheet has a solid background rather than transparency, run it through background removal first. Doing it once on the whole sheet is one operation and one consistent result; doing it on sixteen separate frames afterwards is sixteen chances to diverge.
Individual PNGs versus one sheet
| One sheet | Individual PNGs | |
|---|---|---|
| Setup effort | Low if the grid is real, high if not | Low always |
| Editing one frame | Re-export and re-slice the sheet | Replace one file |
| Frame ordering | Click order in the dialog | Filename sort — zero-pad |
| Draw calls | Batches well — one texture | More textures unless atlased |
| Handles uneven layout | No | Yes — each file is its own frame |
For most 2D projects the draw-call difference is not the bottleneck, and the ergonomics of individual files win. If you do reach a point where texture switching matters, the answer is to pack the finished frames into an atlas as a build step rather than to author them as a hand-cut mega-sheet from the start.
Frequently asked questions
My pixel art is blurry in Godot 4. What did I miss?
The texture filter. Set rendering/textures/canvas_textures/default_texture_filter to Nearest in Project Settings, and check that the node's own Texture Filter is on Inherit rather than an explicit Linear. If it is still soft, the viewport may be scaling non-integrally — look at the stretch mode and scale mode under Display → Window.
Should I use AnimatedSprite2D or an AnimationPlayer driving a Sprite2D?
AnimatedSprite2D for straightforward frame-by-frame animation — it is purpose-built and less setup. AnimationPlayer once you need to animate other things in lockstep with the frames: hitbox positions, sound triggers, particle emission, node visibility. Many projects end up with both.
A sliver of the next frame shows along the edge of my sprite.
Texture bleeding from sampling just outside the region. Switch the filter to Nearest, enable filter_clip if you are using an AtlasTexture, and confirm your cell size divides the texture evenly. A pixel or two of transparent padding between sprites in the source removes the issue permanently.
Can I change frames from code instead of using the animation panel?
Yes. On a Sprite2D, assign to the frame property directly. On an AnimatedSprite2D, call play("walk") or set frame while paused. Driving frames manually is common for things like a health bar built from discrete sprite states.
Cut the sheet into frames first
Godot's importers all assume an even grid. If yours is not one, slice it in the browser and load the results with Add Frames from File(s). Magic Slice reads the alpha channel; Manual & Preset lets you place the lines yourself. Nothing leaves your machine.
Open Sprite Sheet Slicer