
How to Reduce Image File Size Without Visible Quality Loss
Most oversized images are oversized for one boring reason: they are three times larger in pixel dimensions than anywhere they are displayed. Fix that first and the file usually drops 80 to 90 percent before you have touched a quality slider. There are three levers, they have a clear priority order, and pulling them out of order is what produces visibly mushy images that are still too big.
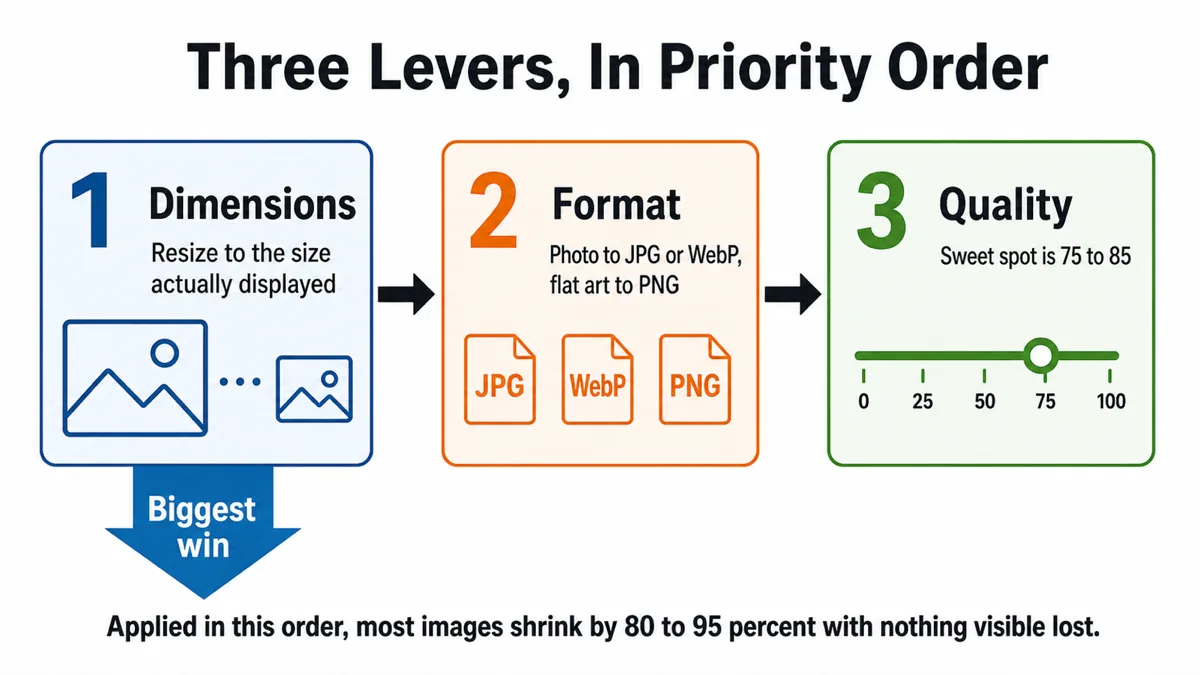
The three levers, in order
- Dimensions. How many pixels the image contains. Halving both width and height removes three quarters of the pixels, and file size follows closely.
- Format. How those pixels are encoded. Getting this wrong — a photograph stored as PNG, a logo stored as JPG — can cost several times the necessary bytes.
- Quality setting. How much detail a lossy encoder discards. Useful, but the smallest of the three levers and the only one that can actually hurt how the image looks.
The order matters because the levers multiply. A 4000×3000 photo saved as PNG might be 12MB. Resizing it to 1200×900 cuts it to roughly a tenth. Switching to JPG cuts that by another large factor. Only then does dropping quality from 95 to 82 do its work, and by that point it is shaving a small remainder rather than papering over a problem that resizing should have solved.
Do it in the opposite order and you get the worst outcome: an image crushed to quality 40 to hit a size target, still carrying four times the pixels it needs, visibly artifacted and larger than it should be. If an image looks bad after compression, the usual cause is that step one was skipped.
Lever 1: resize before you compress
Pick target dimensions from where the image is actually displayed, not from what the camera produced.
| Use | Sensible width | Notes |
|---|---|---|
| Full-bleed hero image | 1920–2560 px | The one place large is justified |
| Article body image | 1200–1600 px | Covers 2x displays at typical column widths |
| Thumbnail / card | 400–800 px | Serve a separate file, do not scale the big one |
| Avatar | 200–400 px | Square, and usually cropped anyway |
| Open Graph card | 1200×630 px | Exactly this; crawlers expect it |
| Email attachment | 1600–2000 px | Enough to view and print small |
Two multipliers to keep in mind. High-density displays mean you want roughly twice the CSS pixel width for a sharp result — an image displayed 600px wide should be about 1200px in the file. And beyond 2x the returns collapse: 3x is nearly indistinguishable from 2x while carrying more than double the bytes.
Lever 2: match the format to the content
A short version of the decision, covered at length in our format comparison guide:
- Photographs → lossy WebP, or JPG where compatibility matters. A photograph stored as PNG is the single most common and most expensive format mistake, often costing five to ten times the necessary size.
- Flat graphics, logos, screenshots, pixel art → PNG, ideally palette PNG. JPG on flat art produces visible ringing around every edge and a larger file than PNG. Lossy WebP is also frequently larger than a palette PNG here.
- Anything needing transparency → PNG, or lossy WebP if the content is photographic. JPG has no alpha channel and will fill your transparency with a solid color.
One real example: a 606KB PNG social card re-exported as JPG at quality 82 came out at 81KB, an 87% reduction from changing one dropdown. It was a photographic image stored in a format built for flat graphics. In the other direction, converting soft gradient page backgrounds from PNG to WebP dropped them by roughly 57% — smooth content with no hard edges is exactly what lossy coding handles best.
Lever 3: the quality setting, and where it stops helping
For JPG and lossy WebP, quality is a number from 0 to 100 that controls how aggressively the encoder quantizes. The relationship between that number and file size is strongly non-linear, and knowing the shape of the curve tells you where to sit.
| Quality | Typical result | When to use it |
|---|---|---|
| 100 | Enormous, no visible gain over 90 | Basically never |
| 90–95 | Large; visually indistinguishable from original | Archival, print, images that get re-edited |
| 75–85 | The sweet spot; artifacts invisible at normal viewing | Almost everything on the web |
| 60–70 | Artifacts visible if you look; modest further savings | Thumbnails, hard size caps |
| Below 50 | Obvious blocking and mushy detail | When a byte limit leaves no choice |
Going from 100 to 90 often removes half the file with nothing perceptible lost. Going from 90 to 80 removes a good chunk more, still invisibly on photographic content. Going from 80 to 70 saves noticeably less while starting to show. Below 60, each further step costs visible quality for shrinking returns. That is the diminishing-returns curve, and it is why quality 80 is such a common default: it sits right at the knee.
Content shifts the knee. Busy, detailed photographs hide artifacts well and tolerate 70. Images with large smooth areas — skies, studio backdrops, gradients — show banding earlier and want 85. Anything containing text or sharp edges should not be in a lossy format at all.
When PNG needs palette quantization
PNG has no quality slider, but it does have a lever most people never touch: reducing the color count. A truecolor PNG stores four bytes per pixel; a palette PNG stores a one-byte index into a table of up to 256 colors. For images that genuinely use few colors, the palette version is several times smaller and, if every color in the image fits in the table, mathematically identical.
Good candidates:
- Logos, icons, and flat illustrations with a handful of colors.
- Pixel art, which is usually authored to a restricted palette anyway.
- UI screenshots, which are mostly flat regions and text.
- Charts and diagrams.
Poor candidates: photographs, anything with smooth gradients, and images with soft anti-aliased edges against many different backgrounds. Quantizing those introduces banding, and a good quantizer will dither to hide it — which adds noise, which compresses badly, which partly undoes the saving.
Alpha needs care here. Palette PNG supports per-palette-entry transparency, so a partially transparent anti-aliased edge consumes palette slots for each blend level. An icon with a soft shadow can burn a large fraction of the 256 entries on shadow gradations. Check the result against a contrasting background before shipping.
Strip the metadata
Camera and phone images carry EXIF blocks: exposure settings, lens model, timestamps, thumbnails, and often GPS coordinates. Design tools add their own chunks. This is typically tens of kilobytes and occasionally far more when an embedded color profile or preview thumbnail is present.
On a 2MB photo it is noise. On a 40KB thumbnail, 15KB of EXIF is more than a third of the file. And there is a second reason beyond size: GPS coordinates in a photo you publish tell everyone where it was taken, which is a privacy problem people rediscover the hard way.
Two things worth keeping deliberately: the color profile, if the image is not already in sRGB (stripping it makes colors shift), and copyright fields if you rely on them. Note that any browser-based tool that re-encodes through a canvas strips metadata automatically as a side effect, since the canvas holds pixels and nothing else.
Recipes for common targets
Under a 25MB email attachment limit
Usually a batch of phone photos. Resize each to 2000px on the long edge, export JPG at quality 85. A typical 12-megapixel photo lands around 500KB, so forty of them fit. If you need more, drop to 1600px before dropping quality — the recipient is viewing on a screen, not printing a poster.
Under a 100KB form or upload cap
Common for profile photos, document uploads, and job applications. Work top-down: resize to the maximum displayed size (often 800px or less), export JPG at quality 80, and check. If still over, step to 70, then reduce dimensions further. Resist going below quality 60 — a 600px image at quality 75 looks considerably better than an 1200px image at quality 45, at the same file size.
Web page images
Aim for under 200KB per content image and under 500KB for a hero. Serve multiple sizes via srcset so phones do not download the desktop version. Lazy-load anything below the fold. And check what the page actually requests — a common failure is a CMS serving the 4000px original with a CSS width of 600px, where the entire problem is a template setting rather than the image file.
Game texture budgets
Different rules apply, because what matters is GPU memory, not download size. GPU memory is driven by dimensions and texture format, not by the PNG's compressed size on disk — a heavily optimized PNG and a bloated one occupy identical VRAM once uploaded. Keep source art lossless, size textures to powers of two where your pipeline wants them, and let the engine's import settings handle GPU compression. Optimizing the PNG itself only affects install size.
Frequently asked questions
What does "without visible quality loss" actually mean?
Not pixel-identical — that would rule out lossy formats entirely. It means no difference you can see at the size the image is viewed, under normal conditions, without flipping between versions. At quality 80 on a photograph you can find changed pixels with a difference tool, and you will not spot them by looking.
Should I resize and compress in one step or two?
One step is better when the tool supports it, because it avoids an intermediate encode. If you must do it in two, make the intermediate lossless — resize and save as PNG, then compress that to JPG or WebP. Resizing a JPG and re-saving as JPG compounds artifacts.
Do lossless PNG optimizers actually help?
Somewhat. Tools that re-run the compression with better parameters typically recover 5 to 20 percent with bit-identical pixels. That is real but small next to resizing or switching format — use it as a final pass, not as your strategy.
Is browser-based compression as good as a desktop tool?
For resizing and re-encoding to JPG or WebP, the browser uses the same underlying codecs and results are comparable. Where dedicated tools pull ahead is advanced PNG quantization and specialized encoders with more tuning knobs. The browser has one real advantage: the image never leaves your machine, which matters when the content is not yours to upload.
The three levers, in one place
The Image Compressor is this guide made usable: pull the quality slider and watch the size, or set a target size and let it search for the quality that lands under your cap — falling back to reducing dimensions when quality alone cannot get there. Need a different format rather than a smaller file? The Image Converter handles PNG, JPG, and WebP in both directions. Both run entirely in your browser.
Open Image CompressorOpen Image Converter