
How to Crop a Circle Profile Picture or a 4:5 Photo Without Stretching It
A profile photo can look fine as a rectangle and lose part of the face when a site displays it as a circle. A portrait post can have the right pixel count and still stretch the subject. Start by choosing what stays in the picture, then resize only if the destination needs a specific output size.
Cropping, resizing and circular display are different jobs
Cropping discards pixels outside a selected area. Resizing changes the dimensions of that area. Circular display is a mask: some websites apply it themselves to a square upload. Read the destination’s requirements first. If it expects a square JPG and supplies its own circle, upload a square crop with enough headroom. If you need a reusable circle with transparent corners for a presentation or website, export a circular PNG instead.
| Your next step | Prepare | Check |
|---|---|---|
| A site masks the avatar itself | Square crop in an accepted format | The face fits within the circular display |
| A circle on any background | Circular PNG | The corners are transparent |
| A 4:5 portrait post | 4:5 rectangular crop | Nothing important is cut off |
| A fixed-size upload | Crop first, then resize | Final pixel dimensions match the requirement |
Make a circular profile picture with room around the face
- Open Image Cropper and add a JPG, PNG or WebP photo in the left panel. HEIC and DNG originals need the dedicated converters first.
- Select the photo’s thumbnail and enable Circular crop before fine-tuning the composition. Enabling it starts a centered square selection; move that selection around the face, then drag the edges or corners to adjust it. Dragging outside the selection draws a new area.
- Leave breathing room above the hair and beside the ears. A circle cuts off the corners of the square, so a face that fits diagonally in the square can still be clipped.
- Check the circular preview. The selection is square, while the saved PNG keeps the region inside the circle and makes the outside transparent. If you turn circular mode off and on again, review the selection again because enabling it resets the crop.
- Download the selected photo. Open the saved PNG against a contrasting background to inspect its edge, then resize separately if the destination needs fewer pixels.
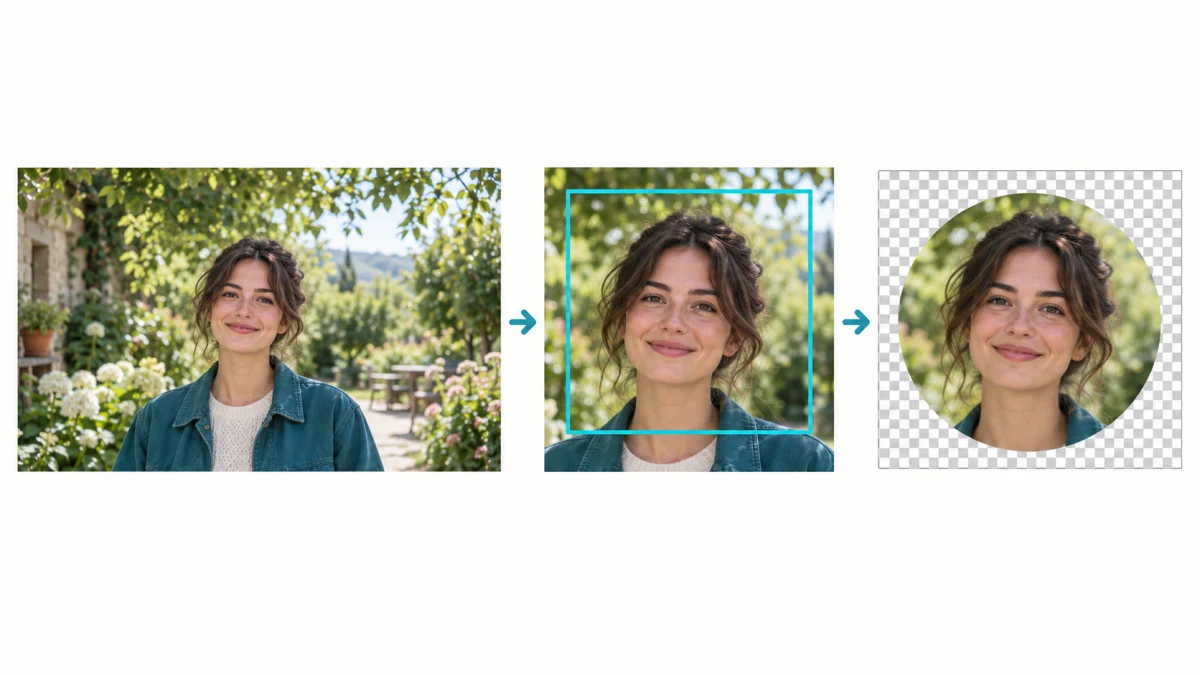
A circular image still has rectangular file dimensions. For example, a 1200 × 1200 crop is a 1200 × 1200 PNG whose corner pixels have no opacity. Some viewers show those corners on white. That alone does not mean transparency failed. Place the PNG on a dark or colored background, or open it in an editor that displays an alpha checkerboard.
Calculate a 4:5 crop before targeting 1080 × 1350
Suppose the original is 3200 × 2400 pixels. Keeping its full height in a 4:5 crop gives a width of 2400 × 4 ÷ 5 = 1920 pixels. A centered crop removes 640 pixels from each horizontal side: (3200 − 1920) ÷ 2. You now have a 1920 × 2400 image. Reposition that area if a subject or product detail would otherwise be cut off.
Choosing 4:5 sets a shape, not a preset export resolution. The cropper downloads the selected original pixels. If the destination requires exactly 1080 × 1350, send the cropped result to Image Resizer. Both sides shrink by the same factor, 0.5625, so the shape stays 4:5. Do not force a full landscape photo into those dimensions by stretching it.
If losing the edges would remove essential content, cropping is the wrong solution. Use a fitting or padding workflow instead. For social frames, Instagram Resizer offers a way to keep the full picture within a different frame shape. Padding and cropping solve different composition problems.
Pick a format for the actual destination
PNG is required for this tool’s circular output because it keeps transparent corners. JPG cannot store transparency; a regular JPG export fills transparent areas with white. For rectangular photographic crops, JPG is often convenient when the upload accepts it. For a logo, lettering, or an image that already contains transparency, PNG may be a better fit.
The quality control affects lossy JPG or WebP encoding, not which source pixels are selected. A tighter crop cannot recover missing facial detail, and enlarging a small crop does not recreate it. Inspect fine detail in the downloaded file at 100% zoom instead of judging only the scaled workspace preview.
Crop several photos without applying the wrong selection
You can add more photos through the same left-panel drop area. Each photo remembers its own selection, ratio and circular option. A group of portraits rarely needs the same position: inspect each thumbnail and adjust for the face or subject. Photos you have not adjusted retain their full original area rather than guessing where you want the crop.
Before downloading the ZIP, check every photo you intend to use. A batch download gathers the individual crop choices; it is not automatic face detection. Work lives in the current tab, so download before refreshing. On a phone, start with a few photos and avoid treating the maximum accepted batch size as a guarantee that the device has enough memory.
Check the file before replacing your profile photo
- Open the downloaded file and confirm its dimensions and orientation.
- For a circular PNG, inspect the corners against a colored background.
- For an avatar, view it at the small size people will actually see; a face that looks good enlarged may be too distant at thumbnail size.
- For a portrait post, look for clipped heads, feet, product labels or text.
- Keep the original. Cropping exports a new file and cannot recover the parts you discarded from that copy.
If the composition is right but the upload says “file too large,” change file size separately with Image Compressor. Do not keep cropping away useful content just to reduce bytes. Camera EXIF and GPS metadata are not copied into this crop export, but private details visible in the photograph still need your review.
Try the workflow
Position a crop on each photo, choose a ratio or circular PNG, and download one result or the collection as a ZIP.
Open Image Cropper →