
How to Remove an Image Background (and When It Will Not Work)
"Remove background" is not one technique, it is three, and they fail in completely different ways. Colour-based removal is instant and perfect on a product shot against white, and useless on a photograph of a person in a park. AI segmentation handles the park and usually wants your image on someone else's server. Manual selection beats both when precision matters more than speed. This article is about telling them apart — including the cases where the honest answer is that our own tool is the wrong choice.
What removing a background actually does
Removing a background does not delete anything. Every pixel is still there; the ones you removed have simply had their alpha set to zero, which means "fully transparent, do not draw me." Alpha is a fourth channel alongside red, green and blue: a per-pixel opacity value that tells whatever composites the image how much of it to paint over the background beneath.
That single fact dictates your export format, and it is the most common place people lose their work without realising. JPEG has no alpha channel. None. There is nowhere in a JPEG file to store "this pixel is transparent," so saving a cut-out as a JPEG discards the transparency and flattens everything you removed onto a solid colour — usually white, sometimes black. The cut-out was correct; the container could not hold it.
So the output has to be PNG or WebP. PNG is the safe default and supports full 8-bit alpha, meaning 256 levels of opacity per pixel rather than a binary on/off. WebP also supports alpha and produces meaningfully smaller files, which matters if the cut-out is going on a web page. GIF technically has transparency but only one fully transparent colour index, which is why GIF cut-outs have hard jagged edges. For the full comparison, see WebP vs PNG vs JPG: Which Format for Your Images?.
Method one: flat-background removal
This is what our Background Remover does, and it is worth describing precisely rather than hiding it behind the word "automatic."
The tool samples the four corner pixels of your image, averages their red, green and blue values, and treats that average as the background colour. It then walks every pixel in the image and measures how far that pixel is from the sampled colour — the sum of the absolute differences across the three channels. If the total falls under a fixed tolerance, the pixel's alpha is set to zero. If it does not, the pixel is left alone. That is the entire algorithm.
It is not clever, and that is precisely why it is fast, predictable and runs on your own machine without sending your image anywhere. It also explains its behaviour exactly. Two consequences follow directly from the description above:
- The corners must be background. The sample is taken from the four corner pixels, so if your subject touches a corner, or the image has a decorative border, or one corner carries a watermark, the sampled colour is wrong and the result will be wrong in a way that looks arbitrary. Crop so that all four corners are clean background before you process.
- It is colour-based, not region-based. The test is applied to every pixel independently, with no notion of which pixels are connected to which. A white background gets removed — and so does the white of an eye, the white text on a label, and the white highlight on a glass bottle, because those pixels are the same colour and the algorithm cannot tell them apart.
Where it works well is a genuinely long list, and these are not edge cases — they are most of the images people actually need cut out:
- Product photographs shot on a seamless white or grey sweep
- Logos and wordmarks exported on a solid background
- Screenshots and UI elements captured against a flat canvas
- Game sprites and sprite sheets, which are usually generated on a single flat colour
- Scanned line art, diagrams, and signatures on white paper
- Icons, stickers, and flat illustration
The tolerance trade-off
Tolerance is the width of the net. Everything within that distance of the sampled colour is removed; everything outside it survives. There is no setting that is right for all images, and the failure modes sit on either side of the correct value.
| Tolerance | What happens | Symptom |
|---|---|---|
| Too low | Only near-exact matches to the sampled colour are removed | A fringe of background survives around the subject; faint blotches remain in areas where lighting varied |
| About right | The background and its lighting variation are caught; the subject is not | Clean edges, subject intact |
| Too high | The net widens far enough to catch colours belonging to the subject | Holes punched through pale parts of the subject; edges eaten away |
The trade-off gets sharper the closer your subject's colours are to the background. A dark logo on white has an enormous safe range — almost any tolerance works. A white ceramic mug on a white background has essentially none: any tolerance wide enough to clear the background's shading also eats the mug. That is not a tuning problem, it is an information problem. The pixels are the same colour, so no colour threshold can separate them, and the fix is upstream: shoot the mug on grey.
Why it fails on photographs
It is worth being blunt about this, because it is the single biggest mismatch between what people expect from a background remover and what a colour-based one can deliver.
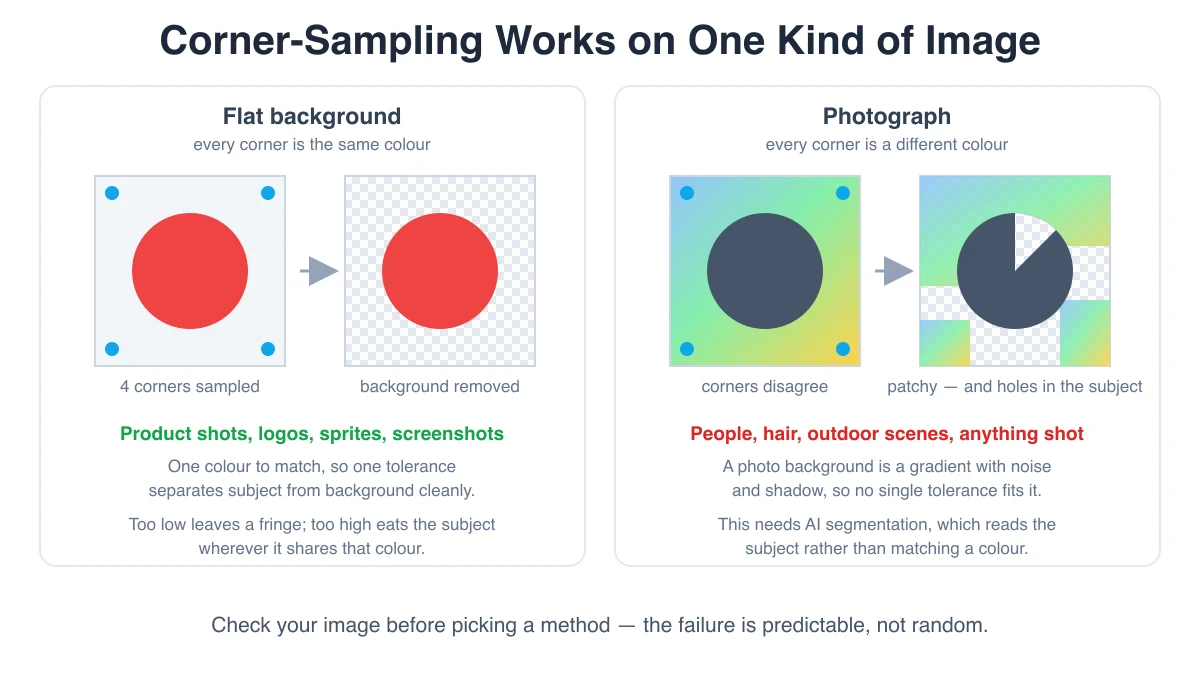
A photograph's background is not one colour. A wall photographed in daylight shifts across the frame as light falls off. A park is dozens of greens and browns. Even a plain studio backdrop carries a gradient from the lighting, plus sensor noise that varies every pixel by a few values, plus the shadow the subject casts onto it. Take the corner sample from a photo like that and it describes one small patch of the background, not the background.
From there the arithmetic decides the outcome. To catch the far corner of a gradient backdrop you need a tolerance wide enough to span the whole lighting falloff. That same tolerance is now easily wide enough to include the subject's shadowed side, their hair, their clothing. You end up choosing between a background that is only half removed and a subject with pieces missing. There is no value in between, because the two distributions of colour overlap. No amount of tuning fixes an overlap.
So: if your image is a photograph of a person, an animal, or a scene, colour-based removal is the wrong tool and no setting will rescue it. That is not a limitation of our implementation specifically — it is what colour thresholding is.
Anti-aliased edges and the halo
Even on a perfect flat background, there is one more effect that surprises people, and it produces the classic thin light rim around a cut-out.
Almost every image has anti-aliased edges. Where the subject meets the background, the renderer or camera does not produce a hard boundary between subject pixels and background pixels; it produces a one-to-two-pixel band of pixels that are a blend of the two. A black logo on white has edge pixels that are grey — not because anything is grey, but because those pixels are partly logo and partly paper.
Now run a colour threshold over that. The pure white is removed. The near-white blend pixels sit outside the tolerance, so they stay, fully opaque, forming a pale outline that follows the subject exactly. Composite that cut-out onto a dark background and the outline is unmistakable. This is the white-halo problem, and it is not caused by the removal being sloppy — it is caused by those pixels genuinely containing background colour, which no threshold can un-mix.
Widening the tolerance to swallow the blend pixels trades one artifact for another: you get a hard aliased edge, and you start eating into the subject. The real treatments — contracting the matte by a pixel, decontaminating edge colour, or re-exporting from a source that still has its alpha — are covered in How to Save Transparent PNGs Without White Edges, which is the companion piece to this one.
Method two: AI segmentation
AI background removal works on a fundamentally different question. Instead of asking "is this pixel close to the background colour?" it asks "is this pixel part of the foreground object?" A segmentation model trained on large numbers of labelled images has learned what a person, a car or a dog looks like, so it can separate a subject from a background that shares its colours entirely. Better models also produce a soft matte with partial alpha values along the boundary, which is what makes hair and fur look plausible instead of cut out with scissors.
For those cases it is simply the right tool, and it would be dishonest to suggest otherwise. Reach for AI segmentation when your image is:
- A photograph of a person, especially with loose or textured hair
- An animal with fur or feathers
- A subject in a real environment rather than on a backdrop
- Anything with a busy, gradient, or multi-coloured background
- Semi-transparent — glass, smoke, veils, motion blur
Method three: manual selection
The third option is doing it by hand in an image editor: pen or path tools for hard geometric edges, a selection brush for organic ones, layer masks so the change stays reversible, and dedicated refine-edge tooling for hair.
It is slow, and it is unbeatable when precision is the point. Manual selection wins when the boundary is genuinely ambiguous and only a human knows where it should fall — a reflection you want to keep but a shadow you want gone, a subject overlapping something the same colour, a logo whose interior counters must be transparent but whose enclosed shapes must not. It is also how you rescue the cases where automation got 95% of the way and left one visible mistake: run the automatic pass first, then fix the remaining region by hand. That hybrid is usually faster than either approach alone.
The cost is that it does not scale. One hero image, yes. Four hundred catalogue photos, no — and that volume case is exactly where a flat backdrop and a colour threshold pay for themselves.
Which method does your image need?
| Your image | Use | Why |
|---|---|---|
| Product on a white or grey sweep | Flat-background removal | Background is one colour with mild shading — a threshold separates it cleanly |
| Logo or wordmark on solid colour | Flat-background removal | High contrast, wide safe tolerance range |
| Game sprite or sprite sheet | Flat-background removal | Generated on a single flat colour by construction |
| Scanned line art or a signature | Flat-background removal | Paper is near-uniform; ink is far from it in colour |
| Portrait, or anyone with visible hair | AI segmentation | Needs a soft matte and object understanding, not a colour test |
| Subject photographed in a real scene | AI segmentation | Background colours overlap the subject's — no threshold exists |
| Pale subject on a pale background | Reshoot, or manual selection | The separating information is not in the pixels |
| One image where the edge must be exactly right | Manual selection | Only a human can decide an ambiguous boundary |
| Hundreds of images on a consistent backdrop | Flat-background removal | Fast, repeatable, and the input was designed for it |
If you are shooting the source images yourself, the whole problem is decided before you press the shutter. A flat, evenly lit backdrop in a colour that appears nowhere on your subject reduces background removal to a threshold and a click. Green and blue screens exist for exactly this reason: they are chosen to be far from human skin tones in colour space, so the separation is unambiguous. Light the backdrop separately from the subject to kill the gradient, and keep the subject far enough forward that its shadow does not fall on it.
Frequently asked questions
Why is there a white edge around my cut-out?
Because the pixels along the subject's edge are anti-aliased — each one is a blend of subject colour and background colour, not one or the other. Removing the exact background colour leaves that blended rim behind, fully opaque, and it shows the moment you composite onto something dark. Nudging the tolerance up swallows the rim but starts eating the subject and hardens the edge. The transparent-PNG guide covers the proper fixes.
Can it remove the background from a photo of a person?
No — not our tool, and not any colour-threshold tool. A photographic background is a range of colours with a gradient, noise and shadows, so a single sampled colour plus a tolerance cannot describe it. Hair makes it worse: strands are thinner than a pixel, so those pixels are part hair and part background and need a soft partial-alpha matte that a binary threshold cannot produce. For portraits, use an AI segmentation tool, and check where it processes your image if the photo is confidential.
Why does my PNG have a black background now?
Almost always because the transparency was flattened somewhere between the removal and what you are looking at. Saving as JPEG does it outright — JPEG has no alpha channel, so the transparent pixels get composited onto a solid colour on the way out. The same thing happens when a converter, a phone gallery app, or an upload pipeline re-encodes your file. Black rather than white usually means the flattening was done against a black canvas, or that the transparent pixels kept RGB values of zero and something drew them at full opacity. Check the actual file format first, then re-export from the original with alpha intact.
Does it work on a background that is a gradient?
Poorly, and the reason is worth understanding. A gradient means the background occupies a whole range of colours while the sample is taken from the corners only. A gentle gradient — a studio sweep with mild falloff — often survives, because the whole range still fits inside one tolerance without reaching the subject. A strong gradient does not: by the time the tolerance is wide enough to reach the far end, it is also wide enough to catch the subject. If the gradient is strong, the practical routes are to flatten it in an editor first, to reshoot on an even backdrop, or to use segmentation instead.
Try it on a flat background
The Background Remover does exactly what this article describes: it samples the four corners of your image, averages them, and clears every pixel within a tolerance of that colour, exporting a PNG with real alpha. On a product shot, a logo, a screenshot, a scan, or a sprite sheet on a flat colour, that is all you need — and it is instant. On a photograph of a person, or any background that is a gradient or a real scene, it will not give you a usable result and an AI segmentation tool is the right call instead. It runs entirely in your browser, so nothing is uploaded anywhere, which is the reason it is worth trying first when the image is not public yet.
Open Background Remover