
Sprite Atlas Packing: Padding, Power-of-Two, and Bleeding
A sprite atlas looks like a simple idea — put all your sprites on one big texture instead of many small files — but the details of how they get packed decide whether your game renders cleanly or develops faint colored fringes at every sprite edge. Here is what an atlas is actually doing, why seams bleed, and the specific settings that stop it.
Why atlases exist: draw calls
Every time a GPU switches from drawing with one texture to drawing with another, that switch has a cost — conceptually a new "draw call." A scene with fifty individually textured sprites, drawn naively, can mean fifty separate draw calls even if every sprite is tiny. On mobile hardware in particular, draw call overhead adds up fast enough to matter for frame rate long before the GPU is doing any meaningful amount of actual pixel work.
A sprite atlas sidesteps this by putting many sprites on one shared texture. As long as everything drawn in a batch samples from the same texture, the renderer can combine those draws into far fewer calls — in the best case, one draw call for every sprite that shares the atlas and the same material. This is why atlases matter more for games with lots of small, frequently redrawn sprites (particle effects, UI icons, tile sets) than for a handful of large background images, where draw call count was never the bottleneck.
Bin packing: fitting sprites into a texture
Given a set of sprites with different sizes, laying them into a single texture with as little wasted space as possible is a version of the classic bin packing problem. Most atlas tools use a variant of one of two approaches:
- Shelf packing: sprites are placed left to right along a row ("shelf") until one does not fit, then a new shelf starts below. Simple and fast, but wastes space when sprite heights vary a lot within a shelf.
- Maximal rectangles / guillotine packing: the packer tracks the free rectangular regions left after each placement and fits new sprites into the best-remaining space, splitting rectangles as it goes. Denser packing, more compute per sprite placed, and the standard approach in most modern atlas tools (TexturePacker, Unity's Sprite Atlas, Godot's exporter) for anything beyond trivial sprite counts.
Rotation is a further optimization some packers offer: rotating a sprite 90 degrees can let it fit a leftover sliver of space it would not fit unrotated. It packs tighter but adds complexity at render time (the UV coordinates have to account for the rotation), so it is usually an opt-in setting rather than a default.
None of this is something you need to implement yourself — engine tooling and dedicated packers handle it. What is worth understanding is that packing density and the padding covered next are in tension: tighter packing means less wasted texture space, but padding between sprites is what prevents the bleeding described below, so a packer set to pack too aggressively can reintroduce visual bugs to save a few percent of texture area.
Texture bleeding: what it is and why it happens
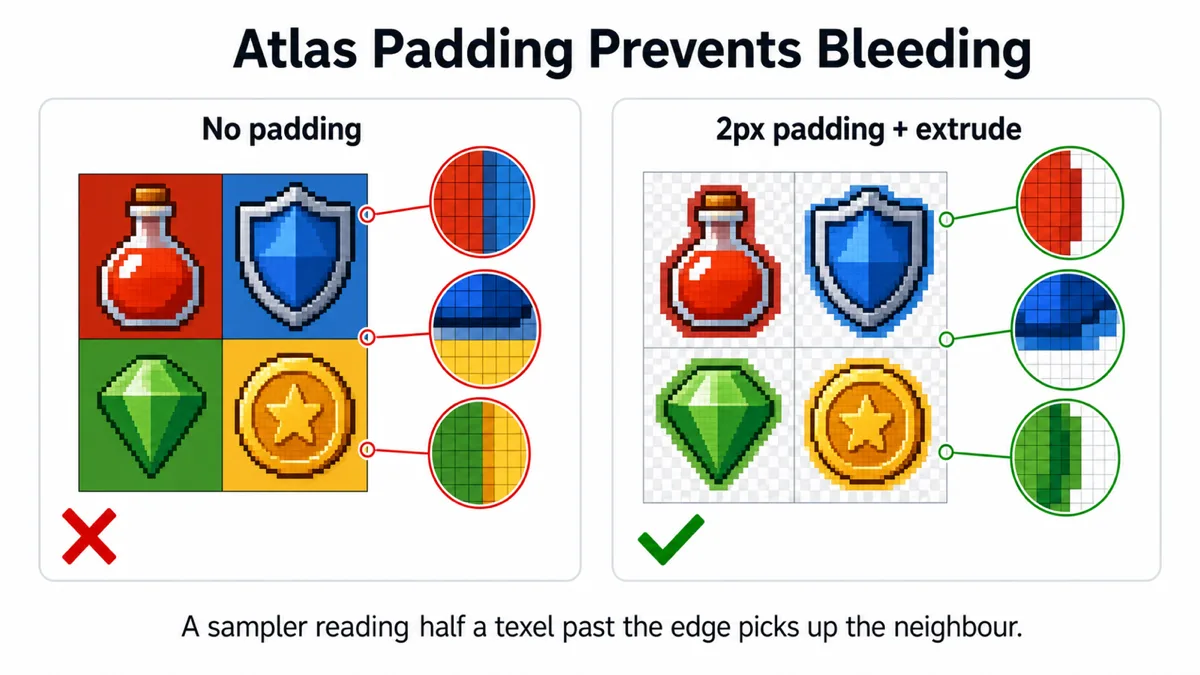
Texture bleeding is when a sprite's rendered edge shows a sliver of color from the sprite packed next to it in the atlas — a thin colored line along one or more sides that has nothing to do with the sprite's own artwork. It is one of the most common atlas-specific bugs, and it has two separate causes that get confused with each other.
Filtering bleed. When a sprite is drawn at a scale other than 1:1, or the camera moves it to a non-pixel-aligned position, the GPU's texture filter samples a small neighborhood of texels around each sample point, not just the single nearest one — even with a point/nearest filter set at the texture level, filtering and mipmapping at the sampling stage can still reach slightly outside a sprite's UV rectangle. If the adjacent atlas region is a different sprite, that neighboring color leaks in.
Mipmap bleed. Mipmaps are pre-shrunk versions of the full texture used when a sprite renders small on screen. Generating a mipmap blends blocks of the full-resolution texture together, which means colors from one sprite can blend into a neighboring sprite's mip level even before any individual sprite is drawn. This is why bleeding sometimes only appears at a distance or at small scale, and looks fine zoomed in.
Both causes trace back to the same root condition: two unrelated sprites sitting immediately adjacent to each other in the atlas, with nothing between them to absorb the sampling error.
Fixing bleed: padding and extrusion
The standard fix is padding — leaving a gap of a few transparent (or duplicated-edge) pixels between every sprite in the atlas, so that any stray sampling lands in the gap instead of on the neighboring sprite's actual content. One to two pixels of padding is enough for most cases at native resolution; if the sprite gets scaled up significantly at render time, or mipmaps are enabled, more padding gives more margin for error.
Plain transparent padding solves the neighboring-sprite-leak problem but introduces a smaller one of its own: at the very edge of the sprite, filtering can now blend the sprite's own edge color with the transparent padding, producing a faint darkening or fringing right at the sprite's boundary rather than a fully clean edge. Extrusion (sometimes called edge extend) fixes this by filling the padding with a copy of the sprite's own edge pixels, stretched outward, rather than leaving it transparent. The neighbor problem is solved the same way — there is still a gap between distinct sprites — but the sprite's own boundary blends with more of itself instead of with empty transparency.
Most atlas tools (TexturePacker, Unity's Sprite Atlas packer, Godot's atlas export) expose both padding size and an extrusion toggle directly in their settings. There is rarely a reason to leave padding at zero; the texture space cost of one or two pixels per sprite edge is small compared to the cost of debugging intermittent seam artifacts that only show up at certain zoom levels.
Does power-of-two still matter?
Historically, GPUs required texture dimensions to be a power of two (256, 512, 1024, 2048…) to support mipmapping and certain wrapping modes efficiently, and non-power-of-two textures either failed outright or fell back to a slower rendering path. Modern GPUs and APIs (OpenGL ES 3+, Metal, Vulkan, DirectX 11+) support non-power-of-two textures natively with no meaningful performance penalty for basic 2D rendering, so the hard requirement is largely gone on current-generation targets.
It still matters in specific situations:
- Mipmapping. Some platforms and older APIs still require power-of-two dimensions to generate a full mip chain cleanly. If your atlas uses mipmaps, check your target platform's actual constraint rather than assuming.
- Older or constrained hardware. Low-end mobile devices, WebGL 1 contexts, and some embedded targets still benefit from or require power-of-two sizing.
- Memory alignment and compression formats. Block-compression formats (used heavily on mobile) compress in fixed-size blocks and sometimes pad non-conforming dimensions up to the next valid size anyway, so choosing a power-of-two size up front avoids that silent padding costing you memory for nothing.
Practically: if you are targeting current desktop, console, or modern mobile hardware with a standard 2D pipeline, non-power-of-two atlas dimensions are fine. If you are targeting WebGL 1, older mobile devices, or anything embedded, power-of-two is still the safer default and costs little — most packers will round the atlas size up to the next power of two automatically when the setting is enabled.
Trimming and pivots
Trimming means the packer crops each sprite down to its actual opaque content before placing it in the atlas, discarding the surrounding transparent margin. This is almost always a net win for packing density — a sprite with a lot of transparent padding around a small character takes up far less atlas space trimmed than untrimmed.
The catch is that trimming changes the sprite's effective size and offset, which matters if your game logic or animation system depends on every frame having the same dimensions and the same pivot point relative to the original canvas. A walk-cycle frame where the character leans left has different opaque bounds than one where they lean right; trimmed independently, the two frames end up different sizes, and naively swapping between them shifts the character's apparent position frame to frame.
Every atlas tool that supports trimming also tracks the original, untrimmed size and offset alongside the trimmed data specifically to solve this — the engine renders the trimmed sprite back at its correct position within the original frame bounds, so the pivot stays visually consistent even though less texture space was spent storing transparent pixels. This is handled automatically by Unity's Sprite Atlas and Godot's importer as long as trimming is enabled through the tool rather than done by hand before sprites reach the packer; hand-trimming sprites yourself before packing throws away the offset metadata the engine needs to reposition them correctly.
One atlas or several?
Cramming everything into a single mega-atlas is not automatically better. A few practical reasons to split into multiple atlases instead:
- Memory residency. If a level only ever uses a subset of your sprites, loading one atlas per level or per scene avoids keeping unused sprite data resident in GPU memory for content the player is not currently near.
- Texture size limits. Hardware imposes a maximum texture dimension (commonly 4096 or 8192 on modern targets, lower on older mobile hardware). A large enough sprite set will not fit in one atlas regardless of packing efficiency.
- Update frequency. Sprites that change often (a rapidly iterated UI) benefit from being in their own atlas separate from stable, rarely-touched art, so a small change does not force a full atlas rebuild and re-upload.
- Material differences. Sprites that need different shaders or blend modes cannot batch together regardless of atlas, so there is no packing benefit to combining them.
A reasonable default is to group by usage context — one atlas for a level's environment tiles, one for its characters, one for UI — and only merge further if profiling shows draw calls are actually a bottleneck for your target hardware.
Frequently asked questions
How much padding do I actually need?
One to two pixels handles most cases at native display scale with mipmaps off. If sprites are scaled up significantly at runtime, or mipmaps are enabled, increase it — there is no universal correct number, and it is worth testing your specific atlas at the scales and zoom levels the game actually uses.
Why does bleeding only show up at certain zoom levels?
That pattern points to mipmap bleed rather than filtering bleed at the base resolution — the specific mip level being sampled at that distance was built from a blend that crossed a sprite boundary. Extrusion and adequate padding address both causes, but if the issue is mip-specific, confirm your padding is wide enough to survive shrinking down through several mip levels, not just the base texture.
Do I need to worry about any of this if I am not using mipmaps or scaling sprites?
Less so, but not zero. Even at 1:1 pixel-perfect rendering with point filtering, sub-pixel camera positions or non-integer sprite placement can cause the GPU to sample a fractional pixel that straddles a boundary. A small amount of padding is cheap insurance even in a purely pixel-perfect 2D setup.
Does trimming affect hitboxes or collision shapes?
Not if your collision shapes are defined independently, which is the common setup. If your project derives collision bounds automatically from sprite dimensions, check whether it reads the trimmed or the original untrimmed size — using the trimmed size directly can shrink a hitbox unexpectedly for frames with a lot of transparent margin.
Building sprites to pack into an atlas?
Sprite Gen combines individual images into one sheet, laying them out in rows with the padding value you set — the shelf packing described above rather than a maximal rectangles variant, which is enough for most icon and frame sets. If your source sprites are still one combined sheet that needs separating first, Sprite Sheet Slicer cuts it into individual frames — both run entirely in the browser, nothing uploaded.
Open Sprite Gen