
How to Cut a Tileset Out of a Single Image
A tileset looks like a sprite sheet at a glance — a grid of small square images on one file — but it has a stricter requirement underneath: every tile has to line up seamlessly against every other tile once it is placed on a map. Cutting one out of a flat reference image, especially one you did not build on a pixel grid from the start, means finding that grid, not just guessing at it.
Tileset versus sprite sheet: why the bar is higher
A sprite sheet holds independent images. If one frame of a walk cycle is a pixel off-center from the next, nobody notices — each frame is drawn on its own, and small positional noise reads as natural motion. A tileset is different. Every tile gets placed edge-to-edge against its neighbors on a grid, over and over, across an entire level. A one-pixel misalignment in a single tile does not stay contained to that tile; it repeats at every seam where that tile appears, and on a tiled ground or wall texture that can mean dozens of visible seams from one bad cut.
That is the whole design constraint of a tileset: seams have to be invisible, which means edges have to be pixel-exact, which means the source image needs a real, findable grid before you cut anything.
Picking a tile size
If you are extracting tiles from someone else's existing asset, the tile size is usually already fixed by the art — count how many times a repeating motif (a brick, a grass tuft, a floor plank) appears across the image width and divide. If you are defining the tileset yourself, from a reference image or a generated texture sheet, common sizes are 16×16, 32×32, and 48×48 pixels.
- 16×16 reads as classic retro pixel art. It is unforgiving of detail — every tile has to communicate its material (grass, stone, water) in a very small number of pixels, which is a real art skill on its own.
- 32×32 is the most common modern default. Enough room for texture and shading without needing sub-pixel precision to read clearly at normal zoom levels.
- 48×48 and above suit games with larger on-screen tiles or more painterly art, where you want visible texture detail rather than a flat pixel-art look.
Whatever you choose, keep it consistent across the whole tileset and, ideally, across every tileset in the project. Mixed tile sizes force you to either scale art at runtime — which reintroduces the exact blurring problems pixel art is trying to avoid — or maintain multiple separate grid systems in your level editor.
Finding the offset when the grid does not start at zero
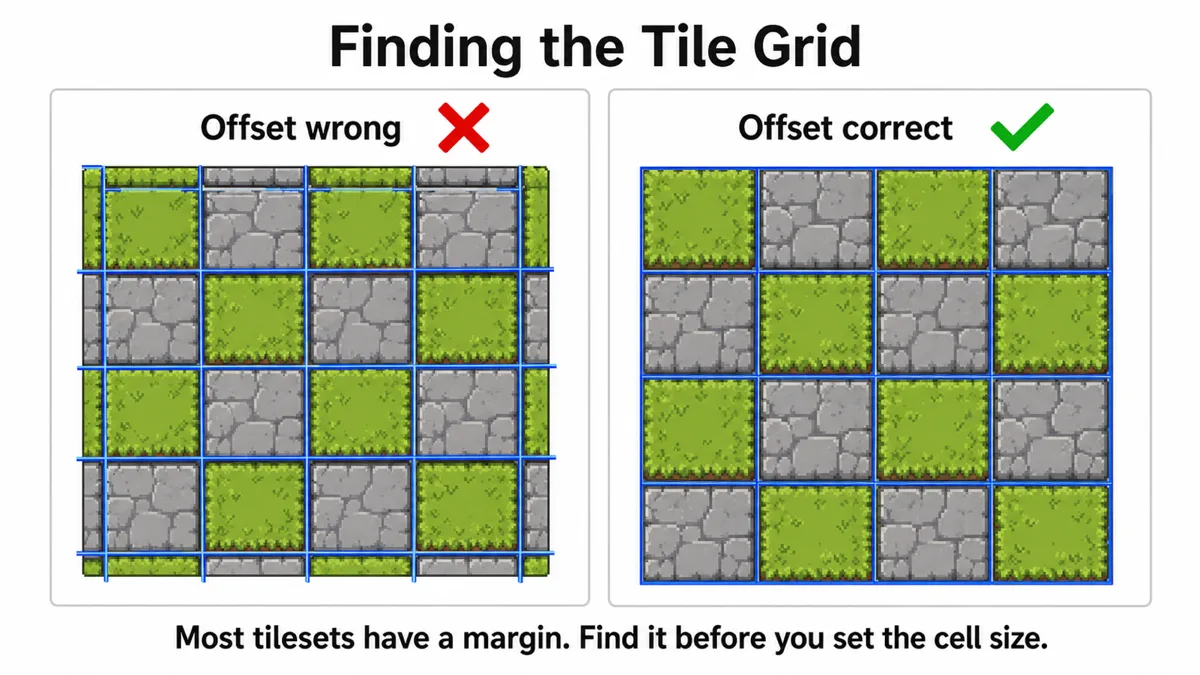
This is the step that trips people up. You know the tile size is 32px, so you slice at 0, 32, 64, 96… and the tiles come out cut in half, with a wall texture that is mostly floor on one row and mostly wall on the next. The tileset's actual grid does not start at the top-left corner of the image — it is offset by some number of pixels, often because the source image has a border, a margin left over from a screenshot, or padding added when it was exported.
To find the offset, zoom into the image at the pixel level and look for a repeating feature — a mortar line between bricks, a shadow at the base of a grass tile, a highlight along the top edge of a tile. Measure the pixel coordinate where that feature first appears, then check whether the same feature recurs every N pixels where N is your tile size. If the first mortar line sits at x = 6 and the next at x = 38, your offset is 6 pixels and your tile size guess of 32 is confirmed. Apply that offset to both axes independently; a horizontal offset and a vertical offset are unrelated and the image can easily have one without the other.
Zero-gap tiles and the bleeding problem
Sprite sheets often have transparent gutters between frames. Tilesets usually do not — tiles butt up directly against each other with zero gap, because that is what lets them tile seamlessly once placed. That has a side effect once the tileset is in an engine: texture bleeding, where a sliver of the neighboring tile shows up at the edge of the one you placed.
Bleeding happens because of how GPUs sample textures. When a tile is drawn at a size that is not an exact 1:1 pixel match — scaled slightly, or sitting on a sub-pixel camera position — the renderer samples a blend of the tile's edge pixel and whatever is directly next to it in the source texture, which is the adjacent tile. The fix is not to add a gap in your source image, which would break the tiling; it is either to use point/nearest filtering so there is no interpolation to bleed, or to have your engine extrude a one-pixel border automatically at packing/import time. Unity's Sprite Atlas and Godot's TileSet importer both have a padding or extrusion option for exactly this — turn it on for any tileset that will be scaled or moved at non-integer positions.
Removing duplicate tiles
Once you have sliced the whole grid, it is common to end up with several tiles that are pixel-identical or near-identical — a plain grass tile might appear four times across a reference sheet because the source artwork repeated it for visual balance. Keeping duplicates is not wrong exactly, but it bloats the tileset asset, makes your level editor's tile palette harder to scan, and means edits to "the grass tile" have to be applied in multiple places later.
A simple way to catch duplicates without eyeballing dozens of small squares: hash each tile's raw pixel data and compare hashes. Tiles with an identical hash are pixel-identical and safe to collapse into one. Near-duplicates — a tile that differs by one recolored pixel, say a lit versus unlit torch — will have different hashes and need a human decision about whether they are meaningfully different tiles or variants worth keeping separate on purpose.
Getting it into an engine
Unity: Tile Palette
Import the sliced tileset as a Sprite with Sprite Mode set to Multiple, slice it in the Sprite Editor using Grid By Cell Size at your tile size, then open Window → 2D → Tile Palette, create a new palette, and drag the sliced sprites in. From there tiles paint directly onto a Tilemap component in the scene. If you already sliced individual tile PNGs outside Unity, you can skip the Sprite Editor step entirely and drag the folder of PNGs straight into a palette.
Godot: TileSet resource
Create a TileSet resource on a TileMapLayer node, and under its Atlas source add your sliced tileset image with the tile size set to match. Godot's importer also exposes a Separation and Margin setting on the atlas source, which covers sheets that do have a small gap between tiles rather than the zero-gap layout described above. If your source had zero gaps and you are seeing bleeding in the editor viewport, enable the atlas's texture padding option, which duplicates edge pixels internally so sampling never reaches into a neighboring tile.
A practical order of operations
- Identify the tile size by counting a repeating feature across the image.
- Find the x and y offset by locating where the first tile actually starts.
- Slice on that grid — a browser tool with draggable grid lines makes this a visual, checkable step rather than blind arithmetic.
- Hash-compare tiles and collapse exact duplicates.
- Import into your engine with padding or extrusion enabled if the tiles will ever render at a non-integer scale or position.
Frequently asked questions
My tiles are cut correctly but there is still a seam between them in-engine.
That is almost always bleeding from texture filtering, not a cutting mistake. Switch the texture's filter mode to point/nearest, or enable your engine's tile padding/extrusion option, which pads each tile with a duplicated edge pixel so interpolation never samples the neighbor.
Can I use an AI-generated image as a tileset source?
You can, but expect the grid to drift — generated tile art rarely lands on exact pixel boundaries the way a hand-built tileset does. Measure the offset carefully per row and column rather than assuming a single fixed offset applies to the whole image; it is common for the drift to compound slightly as you move across the sheet.
Should I add a 1px gap between tiles in my source file?
Not in the source art itself — a gap there would show up as a visible line once tiles are placed edge-to-edge on a map. Keep the source zero-gap and let your engine's import pipeline add internal padding to the packed atlas instead; that solves the bleeding problem without altering how the tiles look when placed.
How do I know if two tiles are meant to be variants or duplicates?
If the pixel data is byte-identical, it is a duplicate and safe to remove. If it differs even slightly — a different crack pattern on a stone tile, for instance — it is probably an intentional variant meant to break up visual repetition on a large tiled surface, and removing it will make your levels look more uniform than the original art intended.
Slice the grid without eyeballing pixel offsets
Sprite Sheet Slicer's Manual & Preset mode lets you drag grid lines directly over the image and see the boundary land exactly where the tile grid actually starts, offset and all. Nothing uploads — slicing runs locally in the browser.
Open Sprite Sheet Slicer